
DevOps
How to Configure a Static IP Address in Linux: Step-by-Step Guide
Have you ever found yourself frustrated with constantly changing IP addresses on your Linux machine? You’re not alone.
Configuring a static IP address can transform your Linux experience, providing stability and ease of access. Imagine the peace of mind knowing that your server or device will always be reachable at the same address. No more guessing games or network hiccups.
This guide will walk you through simple, effective steps to configure a static IP address on your Linux system. Whether you’re a tech enthusiast, a Linux novice, or a seasoned admin, this article is designed with you in mind. Ready to dive in and take control of your network settings once and for all? Keep reading to empower your Linux setup like never before.
Understanding Ip Addresses
Understanding IP addresses is crucial for anyone diving into the world of networking. An IP address is like a unique home address for your device on a network, enabling it to communicate with other devices. But did you know that not all IP addresses are created equal? Some are dynamic, changing over time, while others remain static, providing consistency.
Dynamic Vs Static Ip
Dynamic IP addresses are like rental cars. They change every time you connect to the network. Most home networks use dynamic IPs, assigned by DHCP servers. You might find this convenient since it requires less setup.
However, if you’re setting up a server or need remote access, static IPs are invaluable. Static IPs are like owning a car; they remain constant, allowing you to always know where your device can be found.
Benefits Of Static Ip
Static IPs offer stability. Imagine running a web server; you want people to reach it without hiccups. With a static IP, you ensure your server’s address doesn’t shift, providing reliable access.
Additionally, static IPs make it easier for remote connections. If you need to access your computer from anywhere, a consistent IP address simplifies the setup. Plus, it enhances security by allowing specific IP-based access control.
Consider this: Would you rather have an address that changes unpredictably or one that stays the same? The benefits of static IPs are clear, especially in professional environments.
Credit: ostechnix.com
Prerequisites For Configuration
Configuring a static IP address in Linux requires basic knowledge of network settings. Familiarize yourself with network interfaces and command-line tools. Ensure administrative privileges for making necessary changes.
Configuring a static IP address in Linux can significantly enhance your network’s stability and predictability. Before diving into the technical steps, it’s essential to ensure you have all the prerequisites lined up. This preparatory phase will set the stage for a smooth configuration process. Missing just one component can lead to unnecessary frustration and errors. So, let’s ensure you’re well-prepared to configure your static IP address with confidence. ###Required Tools
Before you start, gather the necessary tools. At a minimum, you’ll need administrative access to your Linux system. This is often achieved via a terminal with sudo privileges. You’ll also need a text editor. Common choices include nano, vim, or gedit. These tools help you edit network configuration files. Choose one you’re comfortable with. Do you have the network details? You’ll need the IP address you wish to set, the subnet mask, gateway, and DNS server addresses. Ensure these details are handy before proceeding. ###Checking Current Network Settings
It’s crucial to understand your current network settings. Start by checking your existing IP configuration. Run the command `ifconfig` or `ip addr show` in the terminal. This will display your current IP address and network interfaces. Verify your network interface name. Common names include eth0, wlan0, or enp3s0. Note it down, as you’ll need it for configuration. Check your current gateway and DNS settings by typing `route -n` and `cat /etc/resolv.conf`. This helps you understand the current setup and plan your static IP configuration accordingly. Have you ever missed a small detail that led to a big problem later? Preparing these prerequisites carefully helps avoid such pitfalls. As you move forward, ensuring these initial steps are complete will make the configuration process much smoother.Identify Network Interface
Configuring a static IP in Linux begins with identifying the network interface. Discover the specific name using the ‘ip addr show’ command. This crucial step ensures accurate changes to the network configuration files.
To configure a static IP address in Linux, identifying the network interface is crucial. Network interfaces are the communication channels between your device and the network. Knowing which interface to use helps avoid connection issues. This section guides you through identifying and choosing the correct network interface for your Linux system.List Network Interfaces
Start by listing all network interfaces on your Linux system. Open a terminal window. Type `ip addr show` and press Enter. This command displays all available interfaces. Each interface has a unique name, like `eth0`, `wlan0`, or `enp3s0`. Note these names for the next steps.Choose Correct Interface
Choosing the correct network interface is vital. Identify which interface connects to your network. If you’re using a wired connection, it’s usually named `eth0` or similar. For wireless connections, look for names starting with `wlan`. Verify by checking the IP addresses assigned to each interface. Pick the interface that matches your network requirements. With the correct interface in hand, you are ready to configure a static IP address.
Credit: danielmiessler.com
Modify Network Configuration Files
Configuring a static IP address in Linux involves editing network configuration files. Adjust settings to specify a fixed IP, ensuring consistent connectivity. Save changes and restart network services to apply the configuration.
Configuring a static IP address in Linux might sound complex, but it’s all about modifying network configuration files. This step is crucial because network configuration files are like the blueprint of your connection settings. By editing them, you can ensure your device maintains a consistent IP address, which is particularly useful for servers or any device requiring steady connectivity. Imagine trying to find your home if the address kept changing—no one wants that for their network. Let’s dive into the specifics. ###Edit Network Interfaces File
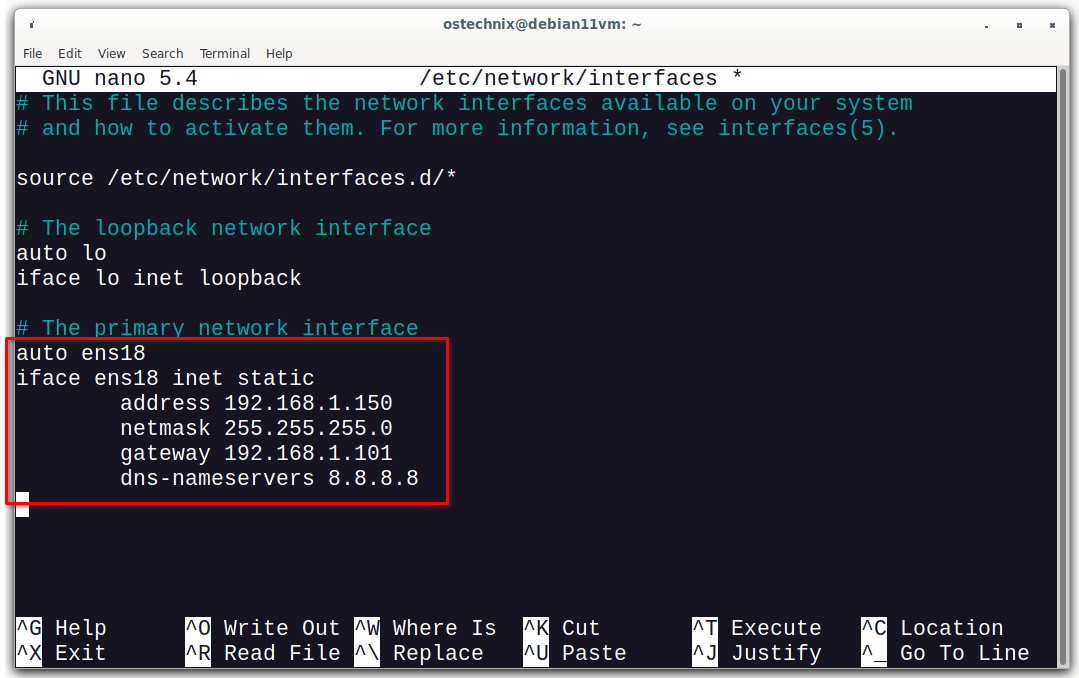
To start, open the network interfaces file. This file holds the key settings for your network connections. You’ll usually find it located at `/etc/network/interfaces`. Use a text editor like Nano or Vim to open it. Here’s a personal tip: I prefer Nano for its simplicity. Open the terminal and type `sudo nano /etc/network/interfaces`. You’ll see lines of configuration defining your network interfaces. Be cautious while editing to avoid disrupting your network setup. ###Add Static Ip Details
Now, you need to add the static IP details to this file. Locate the section that corresponds to your network interface, typically named `eth0` or `ens33`. Add lines to define your static IP, netmask, and gateway. Here’s an example: “` auto eth0 iface eth0 inet static address 192.168.1.100 netmask 255.255.255.0 gateway 192.168.1.1 “` Do you see the pattern? These lines tell your system to use a static IP. Make sure the IP address you choose doesn’t conflict with other devices on your network. A practical tip I learned: keep a spreadsheet of assigned IPs to avoid mix-ups. Once you’ve added the details, save your changes and exit the editor. Restarting the network service will apply the new settings. Type `sudo systemctl restart networking` in the terminal. Feel a sense of accomplishment yet? Configuring a static IP isn’t just a technical task; it’s about creating stability in your digital environment. What other network mysteries can you solve with this newfound knowledge?Apply Changes
Easily configure a static IP address in Linux by editing the network configuration files. Apply changes to ensure a stable network connection. Reboot your system to activate the new settings.
Configuring a static IP address in Linux is just the beginning. Once you’ve made your changes, applying them correctly is crucial to ensure your network settings work smoothly. Mistakes here could lead to connectivity issues, or worse, no connection at all. Let’s dive into how you can apply these changes effectively to get your system up and running.Restart Network Service
Restarting the network service is a simple yet vital step. It ensures that the changes you’ve made take effect immediately. Think of it like rebooting your computer after installing new software. To restart the network service, you can use a straightforward command. Open your terminal and type `sudo systemctl restart networking`. This command is your friend, making sure your Linux system acknowledges the new static IP settings. Sometimes, you’ll find that different Linux distributions have slight variations in command syntax. So, if you’re using a distribution like CentOS, you might need to use `sudo service network restart`. Always check your distribution’s documentation if you’re unsure.Verify Ip Configuration
After restarting the network service, it’s time to verify your IP configuration. This step is crucial to confirm that your static IP is correctly set. You wouldn’t want to discover network issues in the middle of an important task, right? To verify, you can use the `ifconfig` or `ip addr show` command in your terminal. These commands provide detailed information about your network interfaces, including your IP address. As you check your configuration, ensure the IP address matches what you’ve set. Also, verify other details like the subnet mask and gateway. It’s always better to double-check now than troubleshoot connection problems later. Applying changes might seem like a small step, but it’s the bridge between configuration and functionality. Have you ever made a change that didn’t apply correctly and caused a headache later? It happens to the best of us. By restarting and verifying, you can avoid these pitfalls and keep your network running smoothly.Common Issues And Troubleshooting
Configuring a static IP address in Linux can face issues like incorrect network settings. Troubleshooting involves checking configuration files and ensuring the correct IP, netmask, and gateway settings. Restarting network services often resolves connectivity problems, ensuring stable network access.
Configuring a static IP address in Linux can sometimes feel like a puzzle. You might face common issues that could leave you scratching your head. But don’t worry! Understanding these problems and how to troubleshoot them can make the process smoother. Let’s dive into some frequent challenges and their solutions.Resolving Connection Problems
A common issue is losing internet connectivity after setting a static IP. This might happen if you accidentally input the wrong network parameters. Double-check the IP address, subnet mask, gateway, and DNS settings. Have you ever been in a hurry and missed a minor detail? It’s easy to overlook a digit in an IP address or forget a DNS setting. Verify each part carefully. If you find your connection still unreliable, consider restarting your network services. Sometimes, just a simple restart can fix stubborn issues.Checking Network Status
Knowing the status of your network can help identify problems. Use commands like `ifconfig` or `ip addr` to check your IP address settings. They provide a snapshot of current configurations. Imagine checking these settings and realizing your IP isn’t listed. It could mean the configuration didn’t apply correctly. Go back to your network configuration file and ensure everything is saved correctly. Also, consider looking at the routing table with `netstat -r` or `route -n`. An incorrect route can prevent proper connectivity. Is there a default route? If not, you might need to add one. Troubleshooting can be a game of patience and precision. Have you ever fixed a problem only to find another lurking? Keep a checklist of steps to methodically diagnose each issue. Facing these challenges might seem daunting, but remember—you have the tools at your disposal. What tricks have you used to solve networking issues? Sharing your experiences can help others in their troubleshooting journey.Advanced Configuration Options
Advanced configuration options empower users to refine their network settings in Linux. These settings enhance network performance and ensure secure, efficient connectivity. With static IP configuration, explore deeper aspects like DNS and gateway settings.
Setting Up Dns
DNS translates domain names to IP addresses. Configuring DNS is crucial for seamless web access. To set DNS on Linux, edit the /etc/resolv.conf file. Add nameserver entries to specify DNS servers. Use trusted DNS providers for reliability. Google’s DNS, at 8.8.8.8, is a popular choice. Verify DNS settings using the nslookup command.
Configuring Gateway
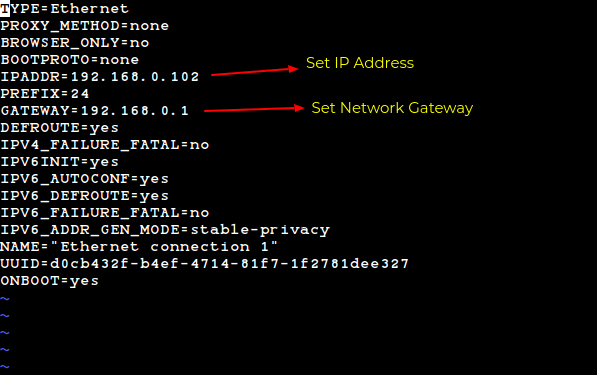
The gateway connects your local network to the internet. Setting a correct gateway ensures data flows smoothly. To configure the gateway, modify the /etc/network/interfaces file. Add the line gateway [your_gateway_IP]. This directs traffic through your chosen gateway IP. Confirm gateway configuration with the route -n command. This displays current routing tables.
Credit: www.tecmint.com
Frequently Asked Questions
How Do I Set A Static Ip In Linux?
To set a static IP in Linux, edit the network configuration file. Locate the file at `/etc/network/interfaces` or `/etc/sysconfig/network-scripts/`. Specify the static IP, subnet mask, and gateway. Save the changes and restart your network service. This configuration ensures your IP remains constant across reboots.
Why Choose A Static Ip Over Dynamic?
A static IP ensures consistent network identification, essential for servers and remote access. It reduces IP conflicts, enhancing network reliability. Unlike dynamic IPs, static IPs don’t change, providing stability for hosting websites or accessing resources remotely. It is ideal for devices requiring permanent addresses, like printers or networked cameras.
What Is The Command To Check Ip Settings?
Use `ifconfig` or `ip addr show` to check your IP settings. These commands display network interfaces, IP addresses, and other essential details. They help verify your current configuration and troubleshoot connectivity issues. Ensure you have the necessary permissions to run these commands for accurate results.
Can I Configure A Static Ip Without Gui Tools?
Yes, configuring a static IP without GUI tools is possible. Use terminal commands to edit network configuration files. Tools like `nano` or `vi` are commonly used for file editing. This method provides flexibility and is useful for servers or environments without graphical interfaces.
Conclusion
Configuring a static IP in Linux is simpler than it seems. Follow the steps, and you ensure stable network access. A static IP keeps your connection reliable. No more IP changes that disrupt your workflow. It suits home and office setups.
Remember, every Linux distribution may have slight differences. Explore documentation for tailored guidance. Practice makes perfect. Familiarize yourself with the commands. Experiment safely in a controlled environment. With patience, you’ll manage network settings with ease. Stay confident, and your network remains steady.
Linux empowers users with control. Enjoy seamless connectivity with your configured static IP.
-

 DevOps7 years ago
Saltstack Tutorial for beginners [2025]
-

 DevOps7 years ago
How to build a Docker cron job Container easily [2025]
-

 Linux7 years ago
mail Command in Linux/Unix with 10+ Examples [2025]
-

 DevOps7 years ago
Docker ADD vs COPY vs VOLUME – [2025]
-
 DevOps6 years ago
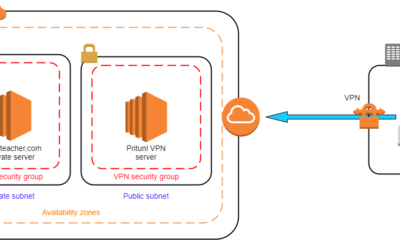
How to setup Pritunl VPN on AWS to Access Servers
-

 Linux7 years ago
Grep Command In Unix/Linux with 25+ Examples [2025]
-

 Linux7 years ago
Find command in Unix/Linux with 30+ Examples [2025]
-
Linux6 years ago
How To setup Django with Postgres, Nginx, and Gunicorn on Ubuntu 20.04