
DevOps
How to setup Pritunl VPN on AWS to Access Servers
Hello Guys, In this article we are going to discuss how to set up a free pritunl VPN server on AWS to connect to the server in your VPC using private IPs of the servers. I have searched a lot on google to find a solution but unfortunately couldn’t find an easy and updated guide for this. that’s why I thought to create a guide for this. OK, let’s start 🙂
This is very easy to do, I assume that you already set up your VPC, public-private subnets and etc.
Please refer below diagram.
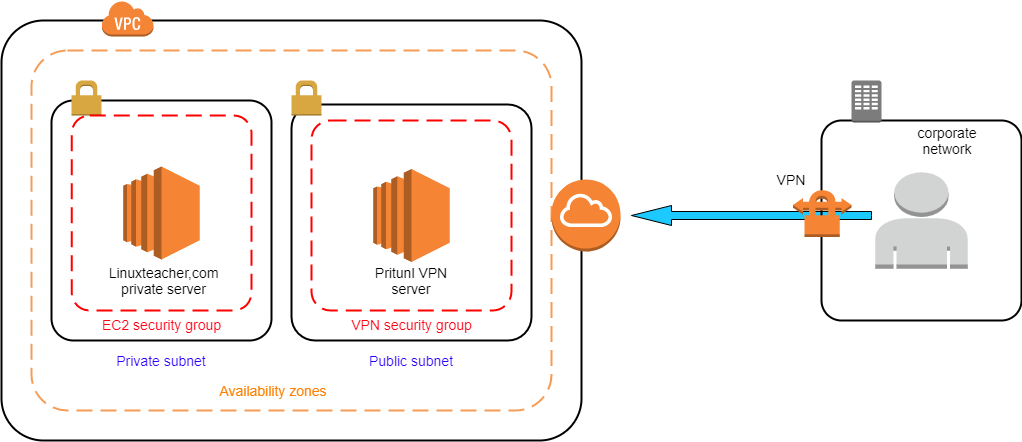
For this scenario, we are creating our VPN server in the public subnet of the VPC. if you want, you can set up the VPN server in another VPC and do the VPC peering also.
you can choose any type of Linux server for this. In this example, I will show you how to install pritunl on Centos 7, Ubuntu bionic, and Amazon Linux 2. Ok, Let’s start.
Create VPN Server Security Group
As the first step, we are creating a specific security group for our pritunl server. Please add bellow rules to your security group
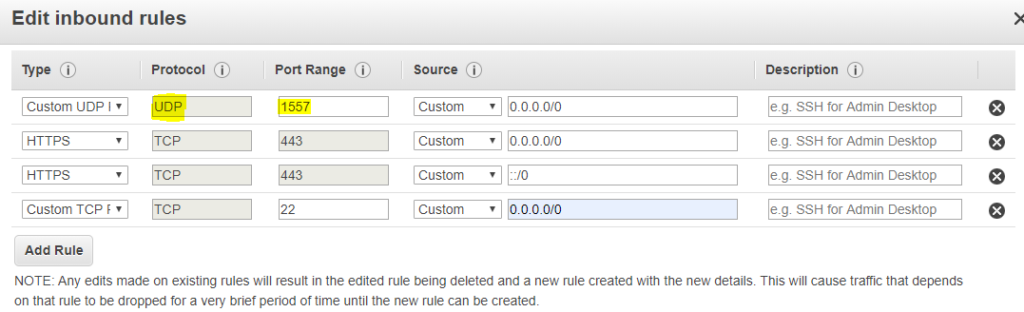
I will discuss later about the highlighted port. Please note that the port is UDP. we can delete the ssh port (22) after we set up the VPN server. we only need it to access the VM to setup pritunl on it.
Now create an EC2 instance on the public subnet and assign this security group to that server. after that, you can assign an elastic IP to the server. you can find plenty of articles regarding creating ec2 instance and assigning elastic IP.
Ok, now our instance is ready. now we are going to install pritunl and MongoDB in that server.
Install pritunl and MongoDB
please chose your OS and follow the instructions. just copy-paste all lines in to the terminal and that’s all 🙂
amazon linux 2
sudo tee /etc/yum.repos.d/mongodb-org-4.2.repo << EOF
[mongodb-org-4.2]
name=MongoDB Repository
baseurl=https://repo.mongodb.org/yum/amazon/2/mongodb-org/4.2/x86_64/
gpgcheck=1
enabled=1
gpgkey=https://www.mongodb.org/static/pgp/server-4.2.asc
EOF
sudo tee /etc/yum.repos.d/pritunl.repo << EOF
[pritunl]
name=Pritunl Repository
baseurl=https://repo.pritunl.com/stable/yum/amazonlinux/2/
gpgcheck=1
enabled=1
EOF
|
1 |
sudo rpm -Uvh https://dl.fedoraproject.org/pub/epel/epel-release-latest-7.noarch.rpm |
|
1 |
gpg --keyserver hkp://keyserver.ubuntu.com --recv-keys 7568D9BB55FF9E5287D586017AE645C0CF8E292A |
|
1 |
gpg --armor --export 7568D9BB55FF9E5287D586017AE645C0CF8E292A > key.tmp; |
|
1 |
sudo rpm --import key.tmp; rm -f key.tmp |
|
1 2 3 4 5 |
sudo yum -y install pritunl mongodb-org sudo systemctl start mongod pritunl sudo systemctl enable mongod pritunl |
CentOS 7
sudo tee /etc/yum.repos.d/mongodb-org-4.2.repo << EOF
[mongodb-org-4.2]
name=MongoDB Repository
baseurl=https://repo.mongodb.org/yum/redhat/7/mongodb-org/4.2/x86_64/
gpgcheck=1
enabled=1
gpgkey=https://www.mongodb.org/static/pgp/server-4.2.asc
EOF
sudo tee /etc/yum.repos.d/pritunl.repo << EOF
[pritunl]
name=Pritunl Repository
baseurl=https://repo.pritunl.com/stable/yum/centos/7/
gpgcheck=1
enabled=1
EOF
|
1 |
sudo rpm -Uvh https://dl.fedoraproject.org/pub/epel/epel-release-latest-7.noarch.rpm |
|
1 |
gpg --keyserver hkp://keyserver.ubuntu.com --recv-keys 7568D9BB55FF9E5287D586017AE645C0CF8E292A |
|
1 |
gpg --armor --export 7568D9BB55FF9E5287D586017AE645C0CF8E292A > key.tmp; |
|
1 |
sudo rpm --import key.tmp; rm -f key.tmp |
|
1 2 3 |
sudo yum -y install pritunl mongodb-org sudo systemctl start mongod pritunl sudo systemctl enable mongod pritunl |
Ubuntu bionic
sudo tee /etc/apt/sources.list.d/mongodb-org-4.2.list << EOF
deb https://repo.mongodb.org/apt/ubuntu bionic/mongodb-org/4.2 multiverse
EOF
sudo tee /etc/apt/sources.list.d/pritunl.list << EOF
deb https://repo.pritunl.com/stable/apt bionic main
EOF
|
1 |
sudo apt-key adv --keyserver hkp://keyserver.ubuntu.com --recv E162F504A20CDF15827F718D4B7C549A058F8B6B |
|
1 |
sudo apt-key adv --keyserver hkp://keyserver.ubuntu.com --recv 7568D9BB55FF9E5287D586017AE645C0CF8E292A |
|
1 2 3 4 |
sudo apt-get update sudo apt-get --assume-yes install pritunl mongodb-server sudo systemctl start pritunl mongodb sudo systemctl enable pritunl mongodb |
So now your Pritunl server is up and running on your server. you can access the web interface using your server public Ip and Https (443) port.
https://public_ip_address_of_vpn_server
Now, you can continue to configure through the web interface
Configure through the Web interface
so when you go to the ” https://public_ip_address_of_vpn_server” you will get this page.
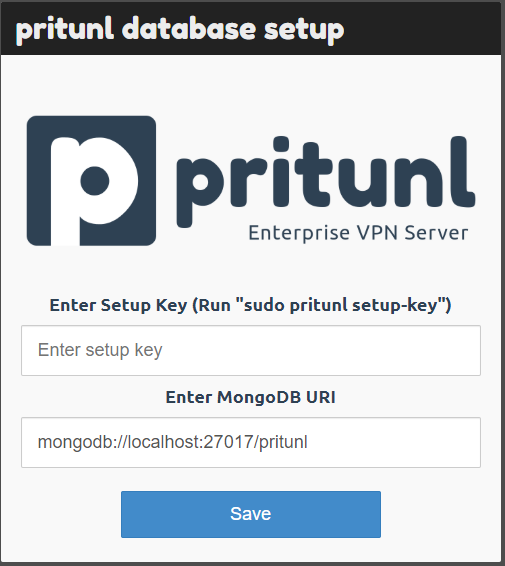
now you need a setup key to continue, to generate the setup key you have to go to the VPN server terminal and type
|
1 |
sudo pritunl setup-key |

you can see the command in the screenshot also. you can copy paste it from your page. Then enter the generated setup key and click save. no need to change MongoDB URI.
After you click the save button it will redirect to the Bellow page.
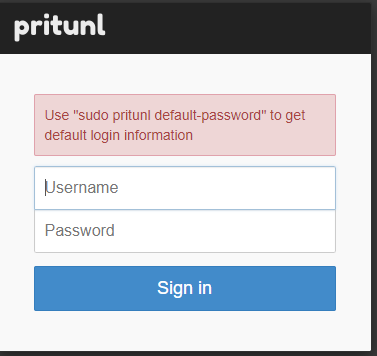
same as the previous step you have to go to the terminal and type this command and it will generate a default username and password.
|
1 |
sudo pritunl default-password |

now you can sign in using those credentials and you can change those later.
then you will get a page like this

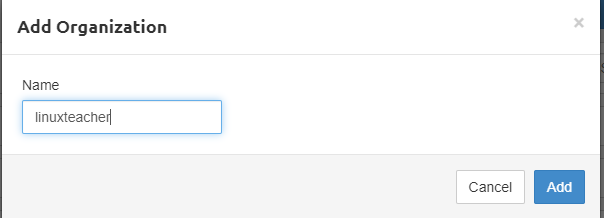
Add Organization
Go to the Users tab and click add organization button

Then it will popup a box-like Bellow screenshot. you can add any name like your company name or any name you preferred and click Add Button.
Add a Server
now go to the servers tab and click on add server button.

it will popup a box-like a bellow

for the name you can give any name you want. The IMPORTANT thing is changing that port to the port that we added to our security group.
do you remember the port?
its 1557 UDP port. you have to add that port here OR you can add any port here and you have to add that port to that VPN server security group. otherwise, the VPN will not work.
No need to change anything else. Don’t worry about the virtual network and no need to change that. there no relation between that virtual network and your VPC CIDR like 10.0.0.0/16.
Then Click Add. you will redirect to page like bellow.
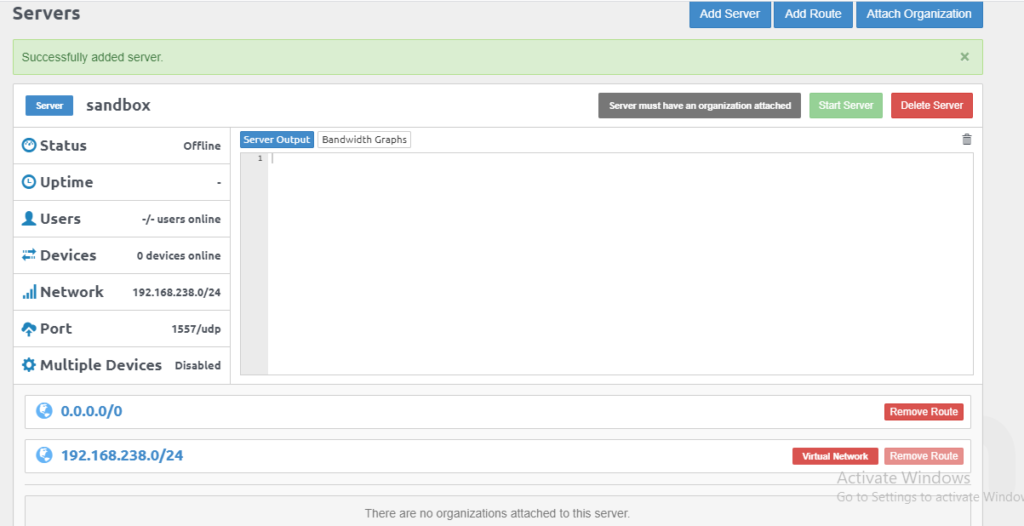
Attach Server to Organization
In the above page can you see a grey color button with the text “Server must have an organization attached”
so you must have attached the organization to the server otherwise you can’t start the server.
Just click on the attached organization button on the same page.

It will popup a box-like bellow.
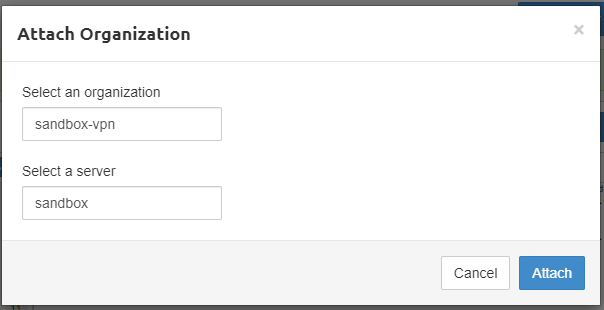
you can give your organization name and server mane. if you have only one organization and one server. it will automatically fill the black and no need to change anything. Click on the Attach button.
Now everything is ready you can click on the Start server button.
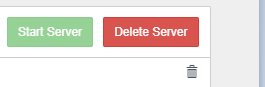
Congratulations !! now your Pritunl Vpn server is up and running.
Allow traffic from Vpn server security to Private subnet security group
So the next key thing is we must allow traffic from our VPN server security group to other security groups.
OK, think like this
you have a server in the private subnet with IP 10.0.0.1 and you want to access that server through VPN. so you have to add a rule like a bellow to your private servers security group. This is IMPORTANT otherwise VPN will not work.

It says allow all traffic from the VPN security group. so if you only need to open ssh port to the VPN then you can change all traffic to ssh port.
ok, now everything is ready. let’s add a VPN user and test IT.
Add VPN User
Go to the Users tab and click on the add user button.
then you will get a popup box like this.
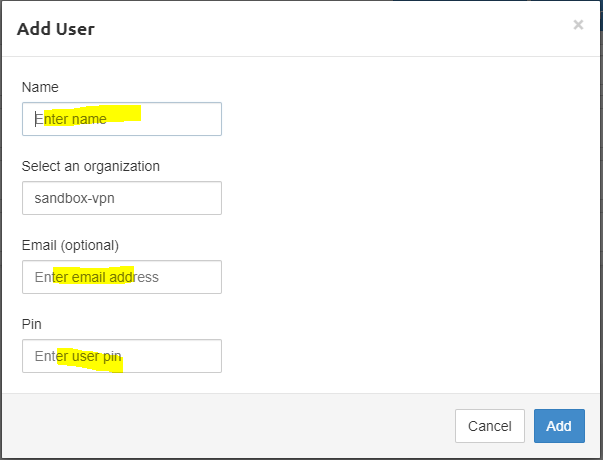
Add a name and mail address. the mail address is optional.
The very important thing is the pin. you need that pin when you are connecting to the VPN. Click On the Add Button.
Now you can see your User.

as the next step click on that highlighted download button. it will download that created user’s VPN client profile RAR file.
Setup Pritunl Client
Now you have to install Pritunl VPN client on your local computer. you can download the client from here.
Windows, Mac and Linux client – https://client.pritunl.com/
After you installed and start the client you can see this green button on the open page.
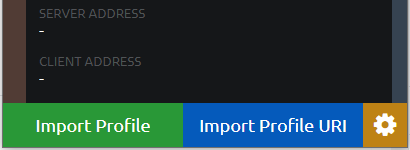
Click on import profile and you can browse to the RAR file we downloaded. After you loaded it you can see your organization name and other Info successfully loaded as the profile.
now you can click on the bellow icon next to the name and then you can see the connect button.

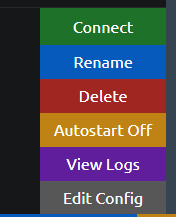
After you click on the connect button it will ask for the pin that we provided when we creating the profile.
if you provide the right pin then VPN client will be connected to the pritunl VPN server successfully.
Congratulations !!
Now you can try to access your servers in the private subnet using private IPs. if you have any issues add a comment on the comment section. I will help 🙂
Also, check our Other DevOps Related article Here
-

 DevOps7 years ago
Saltstack Tutorial for beginners [2025]
-

 DevOps7 years ago
How to build a Docker cron job Container easily [2025]
-

 Linux7 years ago
mail Command in Linux/Unix with 10+ Examples [2025]
-

 DevOps7 years ago
Docker ADD vs COPY vs VOLUME – [2025]
-

 Linux7 years ago
Grep Command In Unix/Linux with 25+ Examples [2025]
-

 Linux7 years ago
Find command in Unix/Linux with 30+ Examples [2025]
-
Linux6 years ago
How To setup Django with Postgres, Nginx, and Gunicorn on Ubuntu 20.04
-

 Linux7 years ago
Whereis command in Linux with 10+ Examples [2025]