
Linux
Buiding an Ansible inventory RHCE EX294 Exam Part 02
In the previous article, we made an introduction to Ansible and walked you through its installation. In this second part series, we will focus on creating an Ansible inventory and defining hosts inside the inventory. At the end of this chapter, you should be able to comprehend the various concepts about Ansible inventory concepts as well as manage a static inventory.
What’s an Ansible inventory?
A good place to start would be to define what an ansible inventory is. In simple terms. An Ansible inventory is a database of hosts or target systems that will be managed by Ansible. It’s in the inventory that you define all the servers or network devices that you are going to configure.
Hosts can be defined individually or grouped into groups which are then managed collectively. A host can be a member of several groups. Groups can also have child groups which we shall discuss further as we go along. Additionally, you can specify variables which can be used to define hosts and groups.
There are 2 types of inventories:
Static Inventory: This is defined in a text file in INI format, which usually resides on the Ansible controller. By default, the default path for inventory files in the /etc/ansible/hosts directory.
Dynamic inventory: This is usually a script-generated file using external cloud providers such as AWS and Azure. A dynamic inventory pulls information from multiple sources.
Defining hosts in a static Ansible inventory
As stated earlier, a static inventory is a text file which usually takes the INI format. It can be edited using conventional text editors such as vim, and nano.
In its basic form, the file the INI style explicitly lists the IP addresses or hostnames as shown:
|
1 2 3 4 |
web-server1.company.com web-server2.company.com 173.82.115.6 173.82.82.100 |
In a large network of multiple hosts, hosts can be grouped into host groups. This provides a much better way of managing them.
NOTE:
By default, 2 host groups exist:
- The ‘all‘ host group which comprises of hosts which are explicitly listed inside the inventory
- The ungrouped host group. This comprises of all hosts specified in the inventory that are not members of any host group.
Picture a scenario where you have 4 web servers, 2 database servers and 2 load balancers. Instead of listing them individually in the inventory file, you can group them using group names enclosed in square brackets [].
Using our conceptual setup, we are going to organize our hosts into webservers, db-servers. and load-balancers host groups.
|
1 2 3 4 5 6 7 8 9 10 11 12 13 |
<strong>[web-servers]</strong> 173.82.202.201 173.80.187.242 173.82.150.145 173.82.115.6 <strong>[db-servers]</strong> db01.company1.com db02.company2.com <strong>[load-balancers]</strong> lb-01.company.com lb-02.company.com |
Additionally, a host can belong to multiple host groups depending on several factors such as the physical location, role of the host and so on.
|
1 2 3 4 5 6 7 8 9 10 11 12 13 14 15 16 17 18 19 20 21 22 23 |
<strong>[web-servers]</strong> 173.82.202.201 173.80.187.242 173.82.150.145 173.82.115.6 <strong>[db-servers]</strong> db01.company1.com db02.company2.com <strong>[ohio-datacenter]</strong> 173.82.202.201 173.80.187.242 db01.company1.com <strong>[miami-datacenter]</strong> 173.82.150.145 173.82.115.6 db02.company2.com <strong>[load-balancers]</strong> lb-01.company.com lb-02.company.com |
Nested host groups
Additionally, you can have host groups that belong to other host groups. This is made possible by having a host group name with the suffix :childrenas shown.
|
1 2 3 4 5 6 7 8 9 10 11 12 13 |
<strong>[ohio-datacenter]</strong> 173.82.202.201 173.80.187.242 db01.company1.com <strong>[miami-datacenter]</strong> 173.82.150.145 173.82.115.6 db02.company2.com <strong>[usa:children]</strong> ohio-datacenter miami-datacenter |
From the above example, the host group USA has 2 child groups which are ohio-datacenter and miami-datacenter.
If you are in doubt about the hosts in your inventory use the syntax below:
Verifying an Ansible inventory
|
1 |
$ ansible host-group --list-hosts |
For example, in my inventory, to see the hosts listed under the host group ohio, run the command:
|
1 |
$ ansible ohio --list-hosts |

To list managed hosts that are not part of a host group, use the ungrouped option as follows:
|
1 |
$ ansible <strong>ungrouped</strong> --list-hosts |
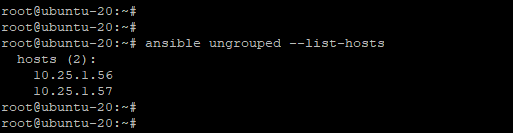
If you specify a host group that does not have any managed hosts specified, you will get an alert informing you that there are no hosts under the particular host group.

Specifying a custom inventory file
By default, the inventory file is the /etc/ansible/hosts file. However, you can create your own inventory file and specify its location using the -i pathname or --inventory pathname option. This is important when you want to specify a different inventory file during playbook execution:
For example, to display managed hosts listed under a host group in an inventory file sitting in the current working directory, use the syntax.
|
1 |
$ ansible hostgroup -i inventory_file --list-hosts |
The example below lists all the managed hosts under the appservers host group using the myinventory.txt inventory file located in the current working directory.
|
1 |
$ ansible appservers -i mynventory.txt --list-hosts |
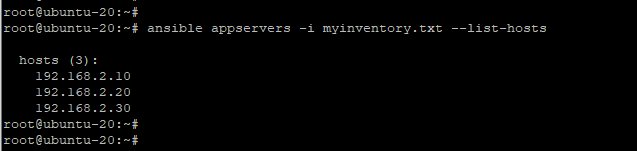
The above command overrides the default inventory file located at /etc/ansible/hosts file and the playbook file will now reference the specified inventory file.
Managing Ansible Configuration files
A user can determine how Ansible runs by customizing the settings of the Ansible configuration file which is located on the control node. In Ansible, the default configuration file is ansible.cfg file located at /etc/ansible/ansible.cfg.
Additionally, ansible can pick the ansible.cfg configuration file from 3 other possible locations.
1) Using the ~/.ansible.cfg file
If the Ansible configuration file exists in the user’s home directory ~/.ansible.cfg , then this file overrides the default configuration file in the /etc/ansible/ansible.cfg path.
2) Using the ./ansible.cfg file in the current directory when running Ansible
If the ansible.cfg file is present in the working directory where Ansible command is being invoked, it is given first priority instead of the user’s personal file or the global file /etc/ansible/ansible.cfg.
3) Using the ANSIBLE_CONFIG environment variable
As earlier mentioned, The ansible.cfg configuration file can be placed in different directories to suit your needs. However, this avenue is quite restrictive and it may prove a challenge managing the configuration files. A better and viable option is to define the configuration file’s location in the ANSIBLE_CONFIG environment variable. When the variable is defined, this takes precedence over the previously discussed configuration files.
CONFIGURATION FILE PRECEDENCE
Due to the myriad of directories in which the Ansible configuration file can be placed, it can be somewhat confusing which configuration file takes precedence. To have an accurate picture of which configuration file is currently in use, invoke the ansible --version command as shown.
|
1 |
$ ansible --version |
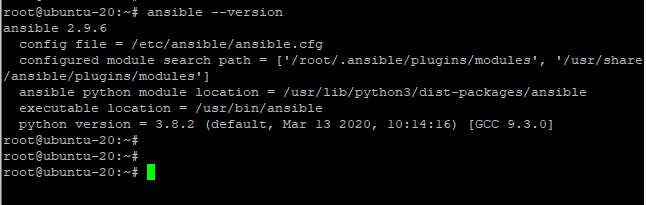
The first line of the output gives us information about the version of Ansible – In this case Ansible version 2.9.6. The second line specifies the default path of the configuration file which is /etc/ansible/ansible.cfg
The ANSIBLE_CONFIG variable always takes the highest precedence. If this environment variable exists on your current shell. it overrides all the other configuration files. So why would you want to use an environment variable? This comes in handy when you have multiple projects and you want them to use a global or specific file other than the one present in the /etc/ansible directory.
Second in line is placing the ansible.cfg file in your current working directory.
If Ansible doesn’t locate the file in your current working directory, it then proceeds to check the file in the user’s home directory – ~/.ansible.cfg.
If there isn’t one there either, It finally grabs the /etc/ansible/ansible.cfg file.
In summary, here’s the precedence:
- The ANSIBLE_CONFIG environment variable.
- The
ansible.cfglocated in your current working directory. .ansible.cfgfile in the home directory).-
/etc/ansible/ansible.cfgfile
EXPLORING SETTINGS IN THE ANSIBLE CONFIGURATION FILE
The Ansible configuration file is the heartbeat of Ansible. It determines how Ansible behaves during playbook execution. With that in mind, we are going to explore the salient parameters. Let’s dive in.
The Ansible configuration file consists of 10 distinct sections. However, for basic operations and the for scope of this guide, we will focus on 2 main sections:
The [defaults] section – Contains the default settings for Ansible.
The [privilege_escalation] – Determines how privilege escalation is performed.
Let’s concentrate on the following key attributes:
inventory – As the name suggests, this defines the path to the inventory file.
remote_user – This is the name of the login user on the managed host. If unspecified, the current user’s name is used instead.
ask_pass – Determines whether or not to prompt for a user password using SSH. This directive is ignored in the case of SSH public key authentication.
become – Specifies whether to switch to a user on the managed host (In most cases the root user) after establishing an SSH connection.
become_method – Specifies the user to switch on to when logged in to the managed host ( Usually this is the sudo user. You can also pass the su option.
become_user – Defines the user to ‘become’ or switch to once logged in.
become_ask_pass – Determines whether to prompt for a password when switching users using the become_method option.
MANAGING CONNECTIONS
One of the key reasons for editing the configuration file is to determine which users and methods Ansible will use to control and configure managed hosts. Key information required by Ansible includes:
The inventory file that lists all the managed hosts, grouped or otherwise.
The connection protocols to connect to the managed hosts. By default, this is usually SSH. Also, it comes in handy if any non-standard port is to be defined.
The remote user to use on the remote hosts. This could either be root or any other unprivileged user.
If you intend to use the unprivileged user on the remote host, Ansible needs to know if to escalate privileges and how to go about it (For example, by invoking sudo )
Whether or prompt to go ahead and prompt for an SSH password or use a sudo password to acquire privileges.
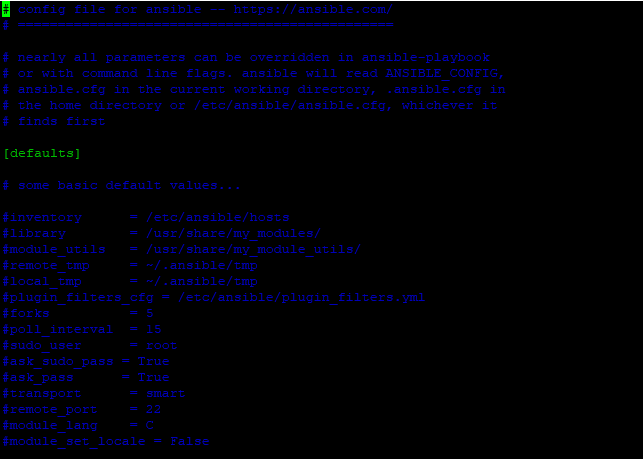
Inventory location
Within the [defaults] section the path to the inventory file is the first to be specified and it’s the default location is /etc/ansible/hosts. It’s usually commented, but if you need to specify the path to your static inventory file, uncomment and provide the inventory path.
For example, the line below places the inventory file to the home directory.
|
1 |
<strong>inventory = ~/</strong>inventory.ini |
Connection settings
By default, Ansible uses the SSH protocol in Ansible, thanks to its strong encryption which keeps information private and confidential. The parameters that determine how you connect via SSH are in the [defaults] section.
Usually, Ansible tries to connect to the remote managed host using the username of the local user who is invoking the Ansible command. However, if you need to specify another remote user, be sure to set the remote_user parameter to the user on the managed host.
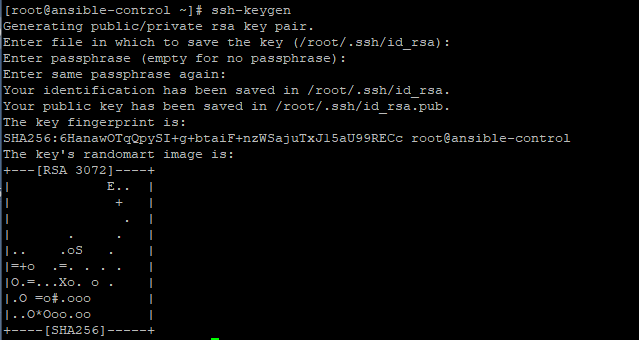
If SSH public key authentication has been configured by the local user, then Ansible will automatically log in without an issue. In that case, you can set ask_pass=false To generate SSH keys, simply run the command:
|
1 |
$ ssh-keygen |
Press ENTER all the way to save the SSH public and private key to your home directory at ~/.ssh
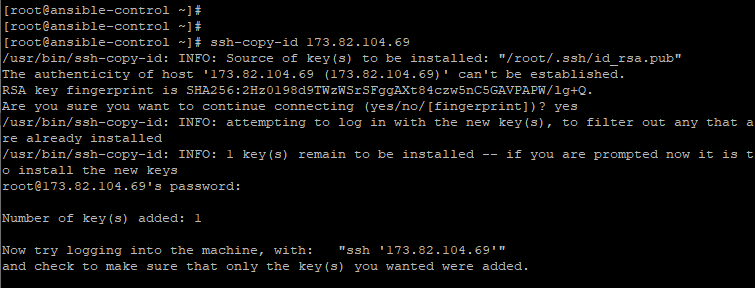
To copy the public key to the managed host, use the ssh-copy-id command as shown:
|
1 |
$ ssh-copy-id root@remote-host-ip |
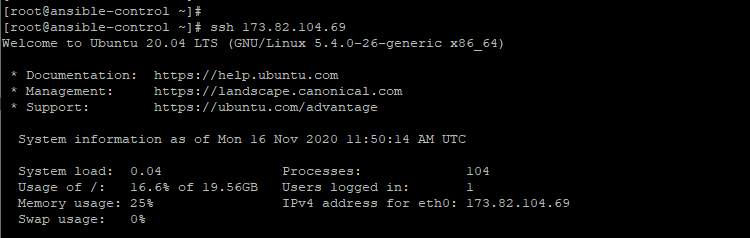
Thereafter, you can log in to the managed host without providing a password. In the example below, we are logging to a Ubuntu managed host.
|
1 |
$ ssh 173.82.104.69 |
Escalating privileges
If you are connecting to Ansible as an underprivileged user, you will need elevated privileges to carry out administrative tasks on the managed host. This can be configured in the [privilege_escalation] section.
To enable escalation by default, set the parameter become=true However, note that this can be overridden when invoking Ansible ad hoc commands or executing playbooks.
The become_method parameter defines how the escalation will be done. The default value for this is usually sudo. Similarly, the become_user directive dictates which user to escalate to, and by default, this is the root user.
If a password is required to escalate privileges, then set the become_ask_pass=true directive.
Non-ssh connections
If localhost is not specified in your inventory, Ansible, by default, creates an implicit localhost entry to allow users to invoke ad hoc commands and run playbooks targeting the localhost system. The localhost entry is usually not present in the inventory. However, Ansible can still connect to your localhost system using a unique localconnection.
You can list the localhost entry as shown.
|
1 |
$ ansible localhost --list-hosts |

The local connection type overrides the remote_user directive and executes commands diretly on your local system. Incase privilege escalation is required, it uses the sudo directive from the user that invokes the Ansible command.
Configuration file comments
Comments, as you would find in any programming language, give a brief description about what a section of code does. Similarly, in Ansible, you will find comments which start with a hash sign ( # ) or semi-colon ( ; ).
The hash sign comments out the entire line. Take note that it shouldn’t be on the same line with a parameter or directive.
Meanwhile, the semi-colon sign comments out anything on the right on a line. You can have it on the same line as a directive provided that the directive is to the left on the line.
RUNNING AD-HOC COMMANDS WITH ANSIBLE
An Ansible ad hoc command is a way of quickly executing simple tasks without writing a playbook file. It’s a simple, one-line command that comes in handy when you want to run a quick test or implement a change. For example, you could use an ad hoc command to check the disk space, uptime, ensure whether a user exists or whether a certain service is running. Those are just a few examples. You can do a whole lot more.
Ad hoc commands are simple but they have their limitations as well. If you want to realize the full potential of Ansible, you would want to leverage the playbook files. However, for simple tasks, ad hoc commands are most recommended.
Running Ad hoc commands
The syntax for running Ansible ad hoc commands is as shown.
|
1 |
$ ansible host-pattern -m module_name -a "module_options" |
Let’s break down the command options:
The host-pattern option specifies the managed host system on which the ad hoc command will run. This should either be an individual host or host group defined in the inventory file. Earlier on, we saw how you can list the available hosts in the inventory file using the --list-hosts option.
|
1 |
$ ansible all --list-hosts |
We have also discussed using the -i option to specify a different inventory location other than the default Ansible inventory file.
The -m option specifies the Ansible module that should be run on the remote hosts. An Ansible module is a small program that’s usually executed to perform a given task. Some modules are quite simple and require no additional information while others need additional options to specify the operation. For modules that are quoted as a string, the -a option is used instead.
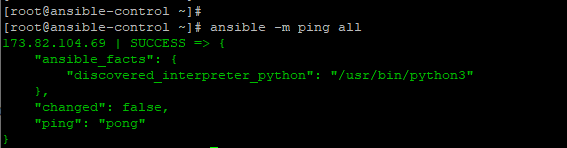
The most simple and basic of all modules is the ping module. It does not send an ICMP echo request to the managed host but probes to see whether you can execute Python-based modules on remote hosts.
|
1 |
$ ansible -m ping all |
The above command checks to see if all the managed hosts in the /etc/ansible/hosts file can run standard modules.
Performing Tasks with Modules Using Ad Hoc Commands
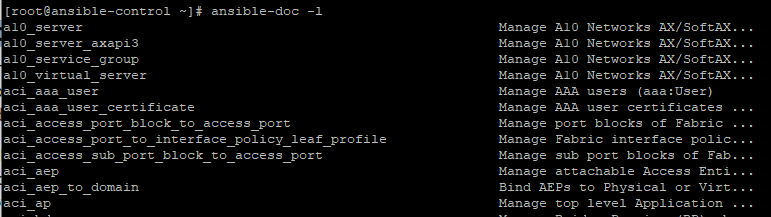
Ansible packs with hundreds upon hundreds of modules to perform various tasks. To list all the modules on a system, use the ansible command as shown.
|
1 |
$ ansible-doc -l |
To view detailed documentation of a specific module, use the syntax shown below.
|
1 |
$ ansible-doc module_name |
For example, to find in-depth information about the ping module, run the command:
|
1 |
$ ansible-doc ping |

For more information about Ansible modules, kindly refer to the Ansible documentation on modules.
In most situations, you are going to pass arguments to ansible modules using the -a flag.
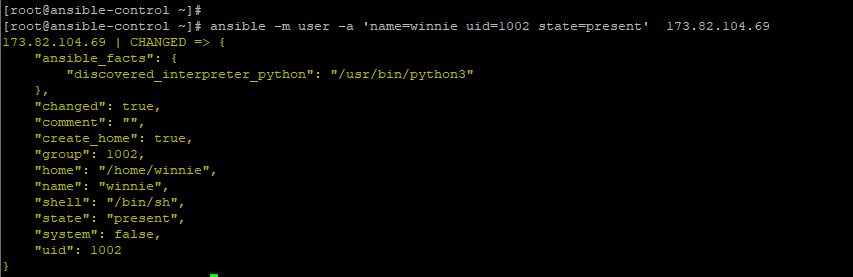
In the example below, we are using the user module to create a new user winnie on the remote system.
|
1 |
$ ansible -m user -a 'name=winnie uid=1002 state=present' 173.82.104.69 |
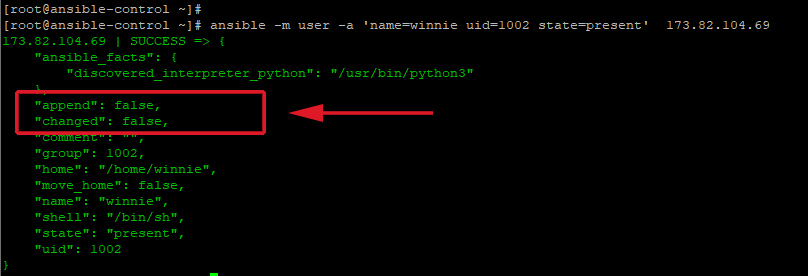
Ansible, modules are idempotent. This implies that you can run them multiple times without yielding different results beyond the first operation. For example, in the previous example, if we try again to create the user winnie, the command will safely run without any changes since the user already exists.
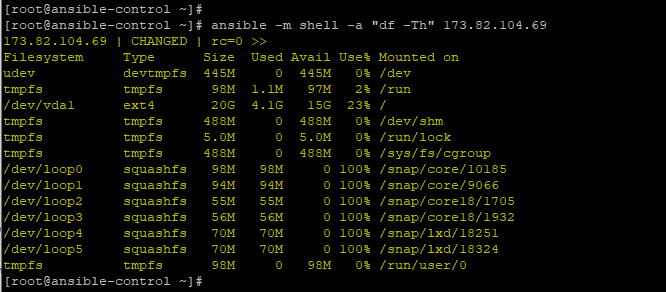
You can also use the shell module to run shell commands on the remote managed host. The command below checks the disk space utilization on the managed host.
|
1 |
$ ansible -m shell -a "df -Th" 173.82.104.69 |
Running Arbitrary Commands on Managed Hosts
Apart from the shell module that allows administrators to run commands on managed hosts, another module that allows users to achieve the same result is the command module. It is passed as an argument using the -a option.
For example, the command below invokes the commands hostname on a managed host system.
|
1 |
$ ansible -m command -a "hostname" 173.82.104.69 |

For improved readability, pass the -o so that the output is displayed on a single line.
|
1 |
$ ansible -m command -a "hostname" 173.82.104.69 -o |

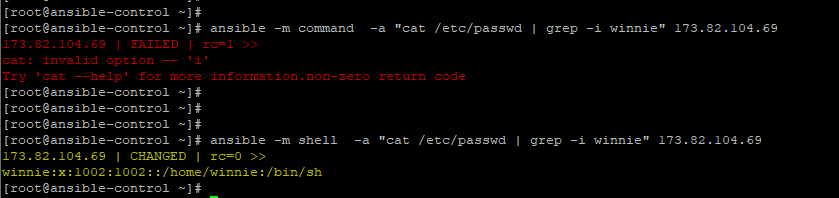
The command module enables system administrators to easily and quickly execute remote commands on remote targets. Take note that the commands are not processed by the shell on remote managed hosts. As such you cannot perform shell operations e.g piping and redirection.
This is where the shell module steps in. The shell module allows you to access the shell of managed hosts and perform shell processing tasks such as piping and redirection.
The example below lists the user details of the user Winnie in the /etc/passwd file using the shell module. Note that the command fails when passing the command module.
|
1 |
$ ansible -m shell -a "cat /etc/passwd | grep -i winnie" 173.82.104.69 |
CONFIGURING CONNECTIONS FOR AD HOC COMMANDS
The directives for privilege escalation can also be defined for use in ad hoc commands. When these directives are used alongside ad hoc commands, they override the default directives in Ansible’s configuration file.
The table below presents the command-line options for the file directives.
| Configuration file directives | Command-line options |
| Inventory | -i |
| remote_user | -u |
| become | –become, -b |
| become_method | –become-method |
| become_user | –become-user |
| become_ask_pass | —ask-become-pass, -K |
-

 DevOps6 years ago
Saltstack Tutorial for beginners [2025]
-

 DevOps6 years ago
How to build a Docker cron job Container easily [2025]
-

 Linux6 years ago
mail Command in Linux/Unix with 10+ Examples [2025]
-

 DevOps6 years ago
Docker ADD vs COPY vs VOLUME – [2025]
-
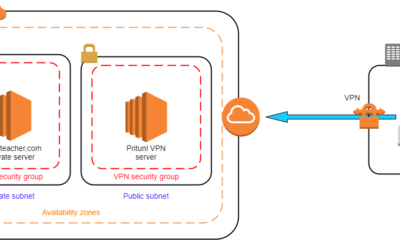
 DevOps5 years ago
How to setup Pritunl VPN on AWS to Access Servers
-

 Linux6 years ago
Grep Command In Unix/Linux with 25+ Examples [2025]
-
Linux5 years ago
How To setup Django with Postgres, Nginx, and Gunicorn on Ubuntu 20.04
-

 Linux6 years ago
Find command in Unix/Linux with 30+ Examples [2025]