
DevOps
Building a Dns Server With Bind9: Ultimate Setup Guide
Are you ready to take control of your own network? Building a DNS server with BIND9 might seem like a daunting task, but it’s more accessible than you think.
Imagine the power of managing your own domain names and keeping your data secure. This article will guide you through the process step-by-step, making it easy for you to understand and implement. By the end, you’ll have the confidence to set up your own server and customize it to your needs.
So why not empower yourself with the knowledge and skills to manage your network like a pro? Dive in and discover how you can make it happen!
Credit: imthiyaz.cloud
Prerequisites And Installation
Setting up a DNS server with Bind9 requires basic knowledge of Linux and networking. Begin by installing Bind9 using package managers like apt or yum, ensuring your system meets the necessary dependencies for smooth operation.
Building a DNS server with Bind9 is an exciting venture that can transform how you manage your network. Whether you’re setting up a home lab or a professional environment, understanding the prerequisites and installation process is vital. This guide will walk you through the essential system requirements and the steps to install Bind9, ensuring a smooth setup for your DNS server.System Requirements
Before you dive into the installation, it’s crucial to ensure your system is ready. Bind9 is compatible with most Unix-based systems, including Linux distributions like Ubuntu, CentOS, and Debian. Your system should have at least 512 MB of RAM for basic operations, though 1 GB is recommended for better performance. Ensure your server has a stable internet connection. This is important for downloading necessary packages and updates. Are your system’s security settings adequate? Always check that your firewall and network configurations are ready to support Bind9.Installing Bind9
With your system prepped, it’s time to install Bind9. On Ubuntu, you can use the command line to add Bind9 with a simple command: `sudo apt-get update` followed by `sudo apt-get install bind9`. Once installed, you’ll find configuration files in the `/etc/bind` directory. These files are the heart of your DNS server. Adjust them to suit your network’s needs. Have you ever tried setting up a service only to find it didn’t work as expected? To avoid this, test your installation by checking Bind9’s status using `sudo systemctl status bind9`. This ensures everything is running smoothly. As you progress through setting up your DNS server, remember the importance of attention to detail. Each setting and configuration can impact the server’s performance and reliability. Are there any challenges you foresee in your setup? Addressing these early on can save you time and frustration later.Configuration Basics
Setting up a DNS server with Bind9 involves understanding configuration basics. Bind9 manages domain names and IP addresses efficiently. Follow straightforward steps for installation and basic configuration to get started.
### Configuration Basics Setting up a DNS server with BIND9 can initially seem like a daunting task, but understanding the configuration basics will make the process manageable and even enjoyable. The heart of configuring BIND9 lies in its various configuration files. These files are where you tell the server how to operate and what domain names to handle. Let’s explore the essentials of these configuration files and how to set them up effectively. ####Understanding Configuration Files
BIND9’s primary configuration file is `named.conf`. This file includes references to other configuration files and defines how the DNS server behaves. You’ll typically encounter three main files: `named.conf.options`, `named.conf.local`, and `named.conf.default-zones`. Each serves a distinct purpose in organizing the server’s settings. When I first started, I found it helpful to think of these files as a set of instructions, with each one providing a different chapter of the server’s story. This mindset turned a seemingly complex task into a straightforward process. ####Configuring Named.conf.options
The `named.conf.options` file is where you configure global server options like DNS forwarding and access controls. It’s akin to setting up the rules of the game. Start by specifying the directory where BIND9 will store its data. Use a simple syntax, like `directory “/var/cache/bind”;`. You can also set up forwarders, which are DNS servers that BIND9 will query when it doesn’t have the answer. This is useful for improving query performance. Don’t forget to define access controls to secure your server from unwanted queries. This file is all about defining how your server interacts with the outside world. Have you considered what level of access you want to give? ####Setting Up Named.conf.local
The `named.conf.local` file is for your custom zone definitions. This is where you define the domains your DNS server will manage. Begin by creating a zone block for each domain. Here’s an example for a domain named `example.com`: “`plaintext zone “example.com” { type master; file “/etc/bind/db.example.com”; }; “` This setup tells BIND9 that your server is the primary DNS server for `example.com`, and it should use the specified file for DNS records. Think of `named.conf.local` as your personal canvas. It’s where you define what your server is truly responsible for. What domains will you add to your server’s repertoire? Every DNS server setup might be slightly different, but these configuration basics will give you a solid foundation. Once you grasp these essentials, you’ll find that building and managing a DNS server with BIND9 is not only feasible but also empowering.Creating Dns Zones
Setting up a DNS server with Bind9 involves creating and managing DNS zones efficiently. This process includes defining records, ensuring proper domain name resolution, and maintaining server performance. Bind9 offers robust tools to help configure and manage DNS zones effectively.
Creating DNS zones is a crucial step when setting up your DNS server with Bind9. Think of DNS zones as the map for your server, guiding how domain names translate into IP addresses. This process ensures that your server knows exactly where to send requests. Without properly configured zones, your DNS server might as well be wandering in the dark, unable to find its way. Are you ready to create these zones and illuminate the path for your server? ###Defining Forward Zones
Forward zones are essential for directing your server on how to convert domain names into IP addresses. This is the most common type of DNS lookup, and it’s vital for everyday internet browsing. You’ll need to create a zone file for each domain, specifying details like the domain name, the server’s IP address, and other essential records. When I first set up a forward zone, I remember the satisfaction of seeing a domain name correctly resolve to an IP. It felt like solving a complex puzzle. Start by editing your named.conf.local file to include the zone statement, and then create the corresponding zone file. Here’s a simple example of a forward zone configuration: “`plaintext zone “example.com” { type master; file “/etc/bind/db.example.com”; }; “` Make sure you have the correct syntax and paths. Small errors can lead to big headaches! ###Defining Reverse Zones
Reverse zones do the opposite of forward zones; they translate IP addresses back into domain names. This is crucial for certain network services and adds an extra layer of verification. Reverse DNS is often used for email servers to ensure that IP addresses have valid domain names associated with them. Creating a reverse zone was a bit of a learning curve for me. It felt like understanding a mirror image. You’ll need to handle the IP addresses in reverse order, which can be a bit counterintuitive at first. Here’s an example of a reverse zone configuration: “`plaintext zone “1.168.192.in-addr.arpa” { type master; file “/etc/bind/db.192.168.1”; }; “` You might wonder why the IP is reversed in the zone name. This is standard practice in DNS to facilitate the reverse lookup process. Are you ready to tackle both forward and reverse zones? With these configurations, you can ensure your DNS server operates smoothly and efficiently.
Credit: www.youtube.com
Managing Zone Files
Managing zone files is a crucial aspect of building a DNS server with Bind9. Zone files define the domains and IP addresses your DNS server will handle. Ensuring these files are correctly set up is vital for smooth DNS operations. You might find it surprisingly straightforward once you dive in. Let’s explore how to create and manage these files efficiently.
Creating Zone Files
Creating zone files involves setting up a text file that lists the DNS records for your domain. You start by defining the domain in the file. It’s like writing a script for your domain’s DNS behavior. Think of it as setting up a map for your server to follow.
Begin with the Start of Authority (SOA) record, which tells the server where to find the domain’s authoritative DNS information. Then, add nameserver (NS) records to specify which servers will handle DNS requests. Make sure each entry is correctly formatted to avoid errors.
Consider using a template to simplify the process. A template can act as a guide, ensuring you include all necessary components. This can be particularly helpful if you’re new to DNS configuration.
Adding Dns Records
Adding DNS records is where you specify details like IP addresses and mail servers. These records are the backbone of your DNS setup. They tell the server how to route traffic and handle requests.
Common DNS records include A records, which map domain names to IP addresses. You’ll also use MX records to route emails to the correct server. Each type of record serves a specific purpose, so it’s essential to understand their roles.
For instance, if you’re setting up a website, you’ll need an A record pointing to your server’s IP address. If you plan to handle emails, MX records will be crucial. Take the time to research and understand what each record does.
One tip is to keep your records organized and documented. A well-maintained record list can save you headaches down the line. Do you have a system for tracking changes? If not, it might be time to establish one.
Managing zone files effectively can set you on the path to a robust DNS server setup. So, how will you ensure your zone files are up-to-date and error-free?
Testing The Dns Server
Setting up a DNS server with Bind9 involves testing its configuration for proper functionality. Ensuring the server responds accurately to queries is crucial. Verify DNS records and connectivity to maintain efficient domain resolution.
Testing your DNS server is a crucial step after setting it up with Bind9. It ensures that everything functions correctly, and your server can resolve domain names effectively. This process might seem daunting, especially if you’ve never done it before. However, with the right tools and troubleshooting steps, you can handle this task with confidence and precision.Using Dig And Nslookup
Two of the most reliable tools for testing a DNS server are Dig and Nslookup. Dig (Domain Information Groper) is a command-line tool that queries DNS servers. It’s straightforward: you enter a command, and Dig returns detailed information about the server’s response. Use Dig to check if your DNS server correctly translates domain names into IP addresses. Nslookup is another command-line tool that provides a simpler interface for querying DNS servers. It’s widely available on most operating systems, making it a convenient choice. You can use Nslookup to verify that your DNS server is resolving addresses as expected. If you’re unsure which to use, try both and see which suits your style. Both can provide valuable insights into your server’s performance.Troubleshooting Common Issues
Sometimes things don’t go as planned, and your DNS server might not work as expected. Don’t panic. Start by checking your configuration files for any typographical errors. Even a small typo can cause significant issues. Consider the network setup next. Ensure that your server is correctly connected and that there are no firewalls blocking DNS traffic. Network issues are common culprits in DNS problems. Finally, check the log files for any error messages. They can point you to the exact issue, saving you time and stress. Remember, troubleshooting is part of the process, and each challenge is a learning opportunity. Is your DNS server still not performing as it should? It might be time to seek advice from online communities or forums. Others have walked this path, and their insights can be invaluable. Testing your DNS server is more than a technical task; it’s an opportunity to enhance your skills. By mastering tools like Dig and Nslookup and honing your troubleshooting abilities, you pave the way for a robust and reliable DNS setup. Are you ready to take your DNS game to the next level?Securing Your Dns Server
Securing your DNS server is vital to protect data and maintain trust. A DNS server is a key part of your network’s infrastructure. It translates domain names into IP addresses. Without proper security, your DNS server can be vulnerable to attacks. These attacks may lead to data theft or service disruption.
Implementing robust security measures is crucial. This ensures your DNS server remains safe. Two important strategies are DNSSEC and access controls. These help protect your server from threats. They also ensure data integrity and confidentiality.
Implementing Dnssec
DNSSEC stands for Domain Name System Security Extensions. It adds a layer of security to DNS. DNSSEC helps prevent data tampering. It uses digital signatures to verify DNS data authenticity. This ensures users receive correct information.
To implement DNSSEC, start by generating key pairs. These keys sign and validate DNS records. Regularly update and secure your keys. This prevents unauthorized access. DNSSEC enhances trust and security. It is a critical step in securing your DNS server.
Configuring Access Controls
Access controls manage who can use your DNS server. They restrict unauthorized access. Use access controls to define permissions. Only authorized users should access critical DNS functions.
Implement firewall rules for your DNS server. This blocks unwanted traffic. Configure IP whitelisting for trusted sources. Regularly review and update access controls. This ensures they remain effective.
Access controls help protect against DNS server attacks. They maintain the integrity and safety of your network.
Optimizing Performance
Improve server speed by building a DNS server with BIND9. It enhances domain resolution, ensuring faster internet connections and better performance. Reliable and efficient, BIND9 simplifies DNS management for optimal server functionality.
Optimizing the performance of your DNS server is crucial for efficient network operations. A well-tuned server can handle requests faster and reduce latency. This ensures users receive quick responses and improves the overall browsing experience. To achieve this, focus on implementing effective caching strategies and load balancing techniques. These methods enhance server responsiveness and reliability.Caching Strategies
Caching reduces the server’s workload and speeds up response times. It stores previously requested data for quick retrieval. This minimizes the need to repeatedly fetch information from remote sources. Bind9 supports caching to enhance DNS query performance. Proper configuration ensures frequently accessed data is readily available. This accelerates domain name resolution and improves user experience.Load Balancing Techniques
Load balancing distributes traffic evenly across multiple servers. This prevents any single server from becoming overwhelmed. Bind9 can be configured to handle DNS requests efficiently. Implementing load balancing improves server reliability and uptime. It ensures consistent performance even during high traffic periods. Using multiple servers for DNS requests enhances redundancy. This provides a backup in case one server fails.Maintaining Your Dns Server
Keeping your DNS server running smoothly is crucial. Regular maintenance ensures optimal performance. It also helps in preventing potential security threats. A well-maintained DNS server reduces downtime. This keeps your network reliable and fast. Let’s explore some essential maintenance tasks.
Monitoring Tools
Monitoring tools help track your DNS server’s health. They provide real-time data. This includes server load and response times. Tools like Nagios and Zabbix are popular. They alert you about issues immediately. This enables quick troubleshooting. Monitoring helps maintain server efficiency. It also aids in identifying bottlenecks.
Updating Bind9
Updating Bind9 is essential for security. Regular updates fix bugs and vulnerabilities. They also enhance performance. Always use the latest version of Bind9. Check for updates frequently. Follow the official Bind9 website for announcements. Updating keeps your server safe and efficient.
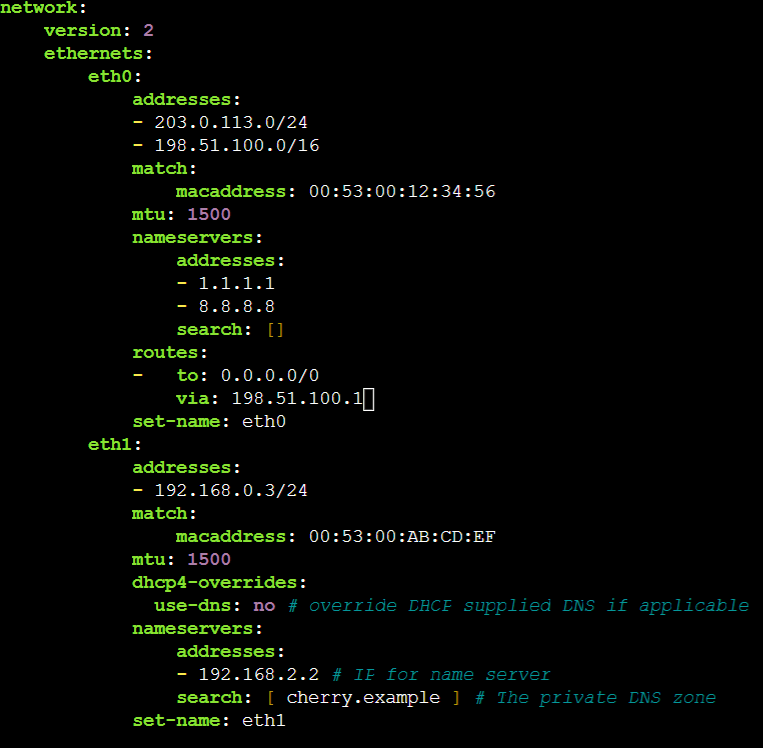
Credit: www.cherryservers.com
Frequently Asked Questions
What Is Bind9 Used For In Dns Servers?
Bind9 is a popular open-source software used to manage DNS servers. It allows administrators to configure domain names and IP addresses. Bind9 is highly flexible and supports various DNS protocols. It is preferred for its reliability and wide range of features.
How Do I Install Bind9 On Linux?
To install Bind9 on Linux, use the package manager specific to your distribution. For Ubuntu, run `sudo apt-get install bind9`. Ensure your system is updated before installation. Configuration files are located in `/etc/bind/`. Follow the documentation for detailed setup instructions.
Can Bind9 Handle Large Dns Queries?
Yes, Bind9 efficiently manages large DNS queries and high traffic volumes. It supports caching, reducing server load during peak times. Its scalability makes it suitable for both small and large networks. Proper configuration can optimize performance and ensure smooth operation.
How Secure Is Bind9 For Dns Management?
Bind9 provides robust security features for DNS management. It supports DNSSEC, ensuring data integrity and authenticity. Regular updates address vulnerabilities, keeping Bind9 secure. Properly configured, it protects against common DNS attacks. Always implement best practices for enhanced security.
Conclusion
Setting up a DNS server with Bind9 is straightforward. It boosts network efficiency. You gain better control and security over your domains. The process empowers users to manage their online presence. Bind9 offers reliability and flexibility. It suits both small and large networks.
Follow the steps carefully for successful configuration. You now have the tools to create a robust DNS server. Dive into the world of network management confidently. Bind9 is your trusted partner in this journey. Start building your DNS server today for improved connectivity.
-

 DevOps6 years ago
Saltstack Tutorial for beginners [2025]
-

 DevOps6 years ago
How to build a Docker cron job Container easily [2025]
-

 Linux7 years ago
mail Command in Linux/Unix with 10+ Examples [2025]
-

 DevOps7 years ago
Docker ADD vs COPY vs VOLUME – [2025]
-
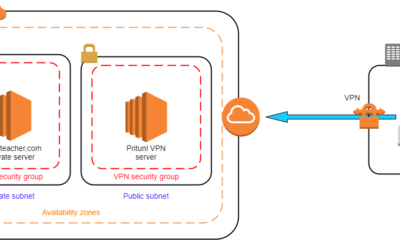
 DevOps6 years ago
How to setup Pritunl VPN on AWS to Access Servers
-

 Linux7 years ago
Grep Command In Unix/Linux with 25+ Examples [2025]
-

 Linux7 years ago
Find command in Unix/Linux with 30+ Examples [2025]
-
Linux6 years ago
How To setup Django with Postgres, Nginx, and Gunicorn on Ubuntu 20.04