
DevOps
How to Build a Custom Linux Kernel: Step-by-Step Guide
Have you ever wanted more control over your Linux system or wondered how you could make it run just the way you want? Building a custom Linux kernel might be the answer.
Imagine having the power to tweak and optimize your system’s performance to cater specifically to your needs. It’s like tailoring a suit that fits perfectly. This process might sound daunting, but with the right guidance, you can accomplish it with ease.
You’ll discover step-by-step how to build a custom Linux kernel. Whether you’re a tech enthusiast aiming to squeeze out extra performance, or simply curious about what’s under the hood of your operating system, this guide is designed for you. You’ll gain insights into the benefits of customizing your kernel and learn how to do it efficiently. Ready to unlock the potential of your Linux system? Keep reading to transform your experience with just a few tweaks!
Credit: boxofcables.dev
Preparing Your Environment
Setting up the right environment is crucial for building a custom Linux kernel. Ensure all necessary tools and dependencies are installed on your system. This prepares your workspace and avoids potential issues during the build process.
Building a custom Linux kernel can be a rewarding endeavor, allowing you to tailor your system to your specific needs. However, before diving into the compilation process, you need to prepare your environment meticulously. This preparation lays the foundation for a successful build and ensures that you have all the necessary resources at your fingertips. Whether you’re a seasoned developer or a curious tech enthusiast, setting up your environment correctly is crucial.System Requirements
First, assess your system’s hardware capabilities. A machine with at least 2GB of RAM and adequate storage space is recommended. The kernel source itself can be hefty, and compiling requires additional space. Ensure your CPU is up for the task; multi-core processors can significantly speed up compilation. Think about the operating system version, too. Are you on a recent distribution that supports the latest kernel features?Necessary Tools And Packages
Equipping your system with the right tools and packages is essential. Start with a compiler like GCC, as it’s the backbone of the compilation process. You’ll also need tools like `make`, which automates the build process. Don’t forget `ncurses` for configuration menus. Have you considered installing `git`? It’s invaluable for fetching the latest kernel sources directly from repositories. Additionally, double-check dependencies. Some distributions have package managers that simplify this task. For instance, on Debian-based systems, `apt-get` can streamline installations. Use package manager commands to verify and install missing components. This step prevents frustrating errors later on. Are you ready to embark on this journey? Preparing your environment is the first crucial step, and with the right setup, you’ll pave the way for a smooth and efficient kernel build process.Downloading The Kernel Source
Building a custom Linux kernel can be a thrilling experience. It gives you control over your system and lets you tailor it to your specific needs. Before diving into the intricacies of the kernel configuration, the first step is downloading the kernel source. This step is crucial as it lays the foundation for everything that follows. But where do you start? How do you ensure you’re downloading the right version from the right place? Let’s break it down.
Choosing The Right Version
Choosing the kernel version is like picking the right tool for the job. Are you looking for stability or cutting-edge features? The latest version might have the newest features, but older versions often offer more stability. Think about your system’s needs and your goals. Are you experimenting or deploying on a production server? Each choice has implications for performance and compatibility. It’s not just about what’s newest—it’s about what’s best for you.
Accessing Official Sources
Your source matters. To ensure you’re getting a clean, untampered version, download from official sources. The primary place is kernel.org, the official site for Linux kernel releases. It’s trustworthy and regularly updated. But don’t just download blindly—check the release notes for insights into what’s included. Knowing the changes can help you decide if this version aligns with your needs.
Have you ever downloaded software only to realize it’s not what you needed? It’s frustrating, right? Avoid that feeling by being diligent in your choice. The right version from the right source makes all the difference.
Downloading the kernel source is not just a technical task—it’s the beginning of your custom kernel journey. So, what will your next move be? Will you take the plunge and start crafting your perfect Linux environment?
Configuring The Kernel
Configuring the kernel involves customizing Linux to suit specific needs. Select modules carefully during configuration for optimal performance. Make sure to compile and install the kernel correctly for a seamless experience.
Configuring the Kernel is a critical step in building a custom Linux kernel. It allows you to tailor the kernel’s behavior to suit your specific hardware and software needs. You might find this process daunting at first, but with a bit of patience and practice, it becomes straightforward. As you dive into configuring the kernel, consider what features you need, what hardware you are using, and how these choices impact system performance.Using Make Menuconfig
Make menuconfig is a user-friendly tool that simplifies kernel configuration. It provides a text-based interface where you can navigate through various options. You can select features to add or remove with ease. The first time I used make menuconfig, I was amazed at how organized everything was. You can simply press the spacebar to select options, and arrow keys guide you through categories. It’s almost like assembling a puzzle, where each piece represents a component of your system. Consider your hardware requirements when using make menuconfig. If you’re building a kernel for a desktop, you might enable support for graphical interfaces. For a server, you might focus on networking and security. What unique configurations will your system need?Essential Configuration Options
When configuring your kernel, certain options are essential. You need to ensure that the kernel supports your hardware components, like CPU architecture and storage devices. For example, if you’re using an Intel processor, make sure to enable the appropriate CPU family. This ensures optimal performance and compatibility. Similarly, configuring the filesystem support is crucial for accessing data on your drives. Don’t overlook security and networking options. Enabling firewall support can protect your system from external threats. If your system will connect to a network, ensure you have the necessary network drivers selected. Have you thought about what features are non-negotiable for your setup? Identifying these can streamline the configuration process and prevent future headaches. Configuring the kernel is an opportunity to create a system that works exactly how you want it to. By carefully selecting the right options, you can optimize performance and functionality, paving the way for a smooth Linux experience.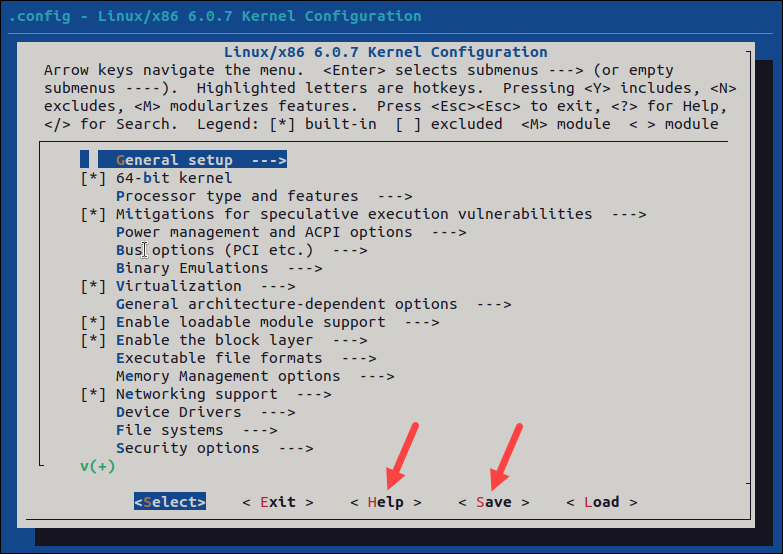
Credit: phoenixnap.com
Compiling The Kernel
Creating a custom Linux kernel involves selecting features and configuring options to suit specific needs. Follow steps to compile and install the kernel, ensuring optimal performance tailored to your system’s requirements.
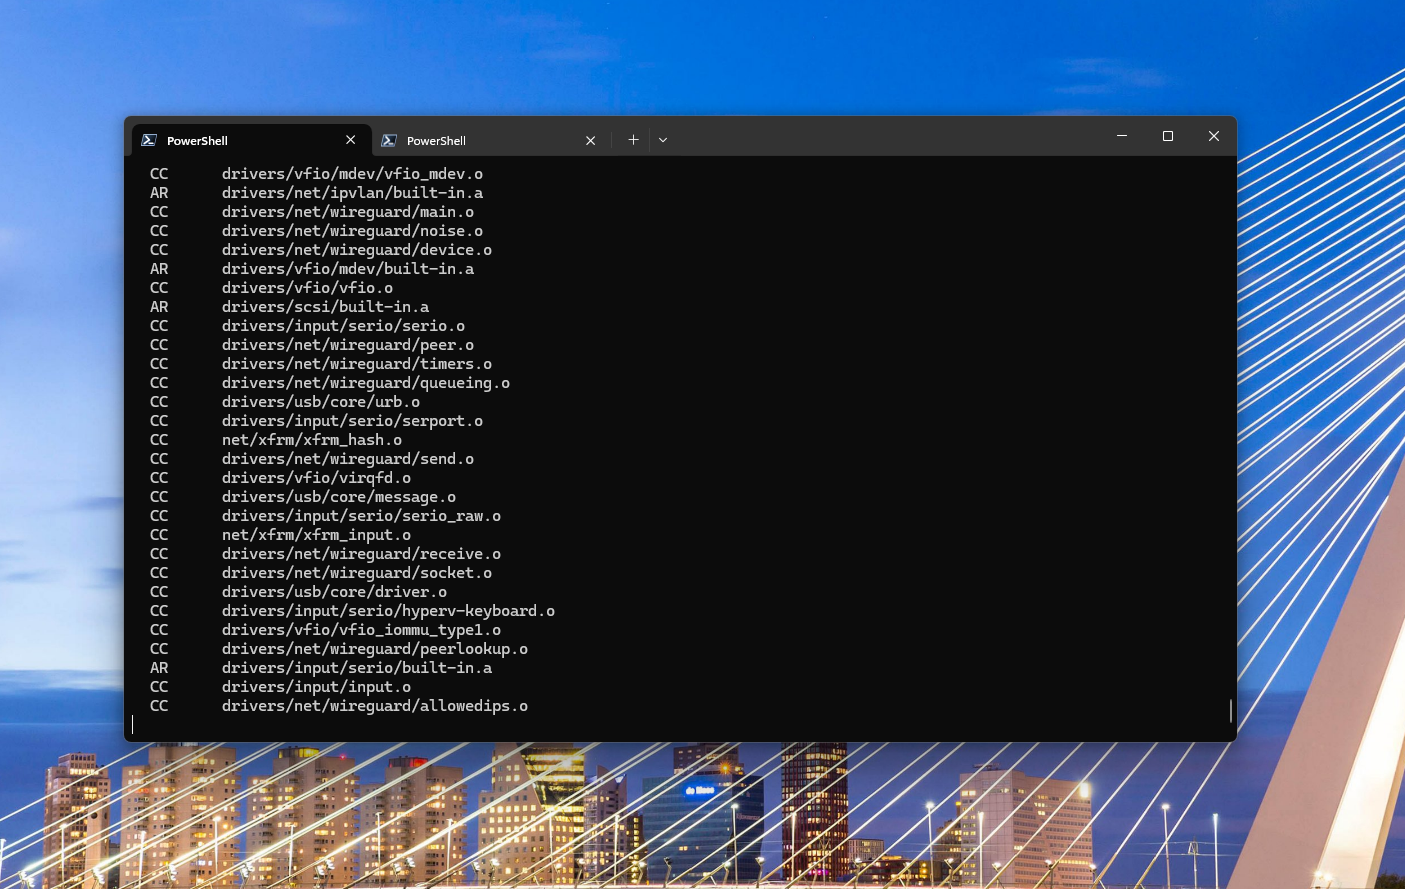
Compiling a custom Linux kernel can seem complex. Yet, it offers great flexibility and control. By compiling your kernel, you tailor it to specific needs. This ensures optimized performance for your hardware. Let’s dive into the steps involved in compiling the kernel.Building The Kernel
First, ensure all dependencies are installed. Use package managers like apt or yum. Then, download the kernel source code from the official site. Extract it to a working directory. Navigate to this directory in your terminal. Configure the kernel using the `make menuconfig` command. This opens a menu-driven interface. Select options based on your hardware and preferences. Save your configuration. Initiate the build process with `make`. This compiles the kernel based on your configuration. The process might take time, depending on system resources. Once done, you will have a compiled kernel image.Handling Errors And Warnings
During compilation, errors may arise. They often relate to missing dependencies. Check the terminal output for error messages. Install any missing packages and re-run `make`. Warnings are less critical but still important. They usually indicate potential issues. Review them to understand their impact. Some warnings can be ignored if they don’t affect functionality. If errors persist, consult online forums or documentation. The Linux community is vast and helpful. They can offer solutions for specific error messages.Installing The Kernel
Building a custom Linux kernel involves installing the kernel after configuring and compiling it. Ensure compatibility with hardware and software by carefully selecting configuration options. Follow steps to compile, then install the new kernel on your system.
Installing the kernel is a pivotal step in the process of building a custom Linux kernel. This is where all your hard work comes to fruition, allowing your system to boot with the new kernel. But how do you ensure everything goes smoothly? Let’s dig into the crucial steps you need to follow to successfully install your newly built kernel and get your system up and running.Copying Necessary Files
The first task is to copy the newly compiled kernel and its modules to the appropriate directories. Typically, this involves moving the kernel image to the `/boot` directory. It sounds simple, but the key is to ensure that you copy the files accurately. Imagine you’ve spent hours compiling; the last thing you want is a misplaced file causing a boot failure. Be meticulous here. Use commands like `cp` in your terminal to copy the kernel image and system.map to `/boot`. It’s also essential to copy the modules to `/lib/modules/` using `make modules_install`. This ensures that all the kernel modules are available for the new kernel.Updating Bootloader Settings
Now comes the part that many find tricky: updating the bootloader. Without this step, your system won’t know there’s a shiny new kernel waiting to be booted. You need to modify the bootloader configuration file, often located in `/etc/grub.d` or similar directories depending on your setup. Ensure you add an entry for your new kernel, specifying the path to the kernel image and any necessary boot parameters. Does your bootloader need a specific command? Double-check the syntax and details before saving your changes. Remember, a small typo can prevent your system from booting correctly. Testing the bootloader changes by rebooting is crucial. Keep a backup kernel entry in case something goes awry. Are you ready to see your efforts take effect? Boot up and watch your system load the custom kernel. It’s a satisfying moment, knowing you’ve tailored your system to your needs. Would you add any unique configurations during bootloader setup?Testing The New Kernel
Building a custom Linux kernel involves compiling source code tailored to specific hardware needs. This process enhances performance and allows for unique system configurations. Testing the new kernel ensures stability and compatibility with existing software.
Testing your new custom Linux kernel ensures it functions correctly. This crucial step identifies and resolves issues before regular use. Testing involves several key processes. Each process checks different aspects of the kernel’s performance.Booting Into The New Kernel
First, boot your system with the new kernel. Restart your computer and select the new kernel from the boot menu. This step verifies the kernel loads properly. If any errors occur, your system might not start. Resolve these issues to ensure a smooth boot process.Verifying Kernel Functionality
Once the system boots, verify kernel functionality. Check hardware compatibility to ensure all devices work. Use commands like `dmesg` to view kernel messages. This helps identify errors or warnings. Test network connections, sound, and display settings. Make sure each component operates as expected. Run performance tests to evaluate speed and stability. Ensure no lag or unusual behavior occurs.Troubleshooting Common Issues
Building a custom Linux kernel can be rewarding. But, it can also present challenges. Troubleshooting is essential for a smooth process. Common issues often arise during kernel compilation. Understanding these can save time and frustration. Let’s explore some frequent problems and how to solve them effectively.
Kernel Panic Solutions
Kernel panic occurs when the system cannot recover from an error. It can be daunting, but solutions exist. First, check for incompatible hardware. This often causes kernel panic. Ensure all drivers are up-to-date. Next, review your configuration files. A small error can lead to big problems. Recompile the kernel with correct settings. Lastly, test with a generic kernel. This helps identify if custom settings cause the issue.
Module Loading Problems
Modules sometimes fail to load correctly. This can disrupt system operations. Begin by verifying module dependencies. Missing dependencies prevent modules from loading. Use the lsmod command to check loaded modules. If your module is absent, troubleshoot further. Ensure the module is compiled for your kernel version. Mismatched versions often cause loading failures. Use modprobe to load modules manually. This helps identify specific errors. Check dmesg logs for detailed error messages. They provide clues for resolving issues.
Optimizing Kernel Performance
Building a custom Linux kernel enhances performance and control. Carefully select kernel options to suit your hardware needs. Focus on removing unnecessary features to streamline operations and improve efficiency.
Building a custom Linux kernel can feel like crafting your personal digital beast. But what’s the point of a beast that doesn’t perform at its peak? Optimizing kernel performance is crucial if you want your system to be agile and responsive. Whether you’re a developer seeking to squeeze out every drop of efficiency or just someone curious about improving your Linux experience, diving into kernel optimization can be both thrilling and rewarding. But where do you start?Fine-tuning Parameters
Adjusting the kernel parameters is like tweaking the settings of a high-performance engine. You can control how your system allocates resources, manages processes, and handles security. Start by reviewing the kernel’s configuration files. Use tools like `make menuconfig` or `make xconfig` to explore different settings. You might find that disabling unnecessary modules can free up resources, leading to smoother performance. Experimentation is key. Try different configurations and observe the impact on your system. You might be surprised how a small change can lead to significant performance gains.Reducing Boot Time
A sluggish boot process can be incredibly frustrating. Have you ever timed how long it takes for your system to start? Reducing boot time is not just about speed; it’s about efficiency. Start by disabling services you don’t need during startup. Use commands like `systemctl` to manage these services effectively. Consider enabling parallel booting. This allows multiple startup scripts to run simultaneously, shaving precious seconds off your boot time. Lastly, review your kernel’s initramfs. A leaner initramfs can significantly decrease the boot time, making your system ready in a flash. Have you ever thought about what a few seconds saved each day adds up to over a year? Small improvements can make a big difference over time.
Credit: www.maketecheasier.com
Frequently Asked Questions
How To Create An Own Linux Kernel?
To create your own Linux kernel, download the kernel source from kernel. org. Configure it using ‘make menuconfig’, compile with ‘make’, and install with ‘make install’. Ensure you have necessary tools like GCC. Backup your current system before proceeding to avoid any issues.
Is It Legal To Modify Linux Kernel?
Yes, modifying the Linux kernel is legal. It is open-source under the GPL license. You can alter, distribute, and use it freely, provided you adhere to the license terms. Sharing modifications with the community is encouraged but not mandatory. Always respect intellectual property rights and licensing agreements.
Is It Hard To Make A Kernel?
Creating a kernel is challenging and requires advanced programming skills and knowledge of operating systems. It’s a complex task that demands understanding of hardware interactions and system architecture. Beginners may find it difficult, but experienced developers can tackle it with dedication and the right resources.
Is The Linux Kernel C Or C++?
The Linux kernel is primarily written in C. Some assembly code is also used for architecture-specific details. C++ is not used for the Linux kernel development. The choice of C ensures efficiency and direct hardware manipulation, which is crucial for operating system performance.
Conclusion
Building a custom Linux kernel might seem tricky at first. But with patience, you can succeed. Start by understanding your hardware needs. Choose the right configuration. Follow steps carefully, and you’ll soon have your own tailored kernel. This journey enhances your control and security.
Plus, it helps you learn more about Linux. Keep exploring, and you’ll find new ways to improve your system. Remember, each tweak brings you closer to your ideal setup. Dive in, experiment, and enjoy the process. Your Linux experience will be more rewarding and personalized with each step.
-

 DevOps6 years ago
Saltstack Tutorial for beginners [2025]
-

 DevOps6 years ago
How to build a Docker cron job Container easily [2025]
-

 Linux7 years ago
mail Command in Linux/Unix with 10+ Examples [2025]
-

 DevOps7 years ago
Docker ADD vs COPY vs VOLUME – [2025]
-
 DevOps6 years ago
How to setup Pritunl VPN on AWS to Access Servers
-

 Linux7 years ago
Grep Command In Unix/Linux with 25+ Examples [2025]
-

 Linux7 years ago
Find command in Unix/Linux with 30+ Examples [2025]
-
Linux6 years ago
How To setup Django with Postgres, Nginx, and Gunicorn on Ubuntu 20.04