
DevOps
How to Set up a 3 node Kubernetes cluster on Ubuntu 20.04
Colloquially known as k8s, Kubernetes is an open-source tool used for management of Docker containers. As a container orchestration platform, Kubernetes is programmed for the management, scaling, and deployment of containerized applications. With that in mind, we’ll touch base on how you can set up a 3 node Kubernetes cluster on Ubuntu 20.04 LTS.
Without much further ado, let’s roll our sleeves.
Lab setup
This will be our model setup for this tutorial:
Master node: – k8-master – IP: 10.128.0.41
Slave Node 1: – k8-slave – IP: 10.128.0.39
Slave Node 2: – k8-slave2 – IP: 10.128.0.40
For each of the nodes, ensure that they meet the following minimum prerequisites.
- 2 CPUs
- 8 GB of hard disk space
- 4 GB of RAM
Having looked at the basic requirements and the setup, let now see how you can configure a Kubernetes cluster on Ubuntu 20.04.
Step 1: Set up the hostname and update the host files
First off, you need to log in to each the Kubernetes nodes using ssh and set up the hostname as shown:
For the master node:
|
1 |
$ sudo hostnamectl set-hostname k8-master |
Slave 1 node:
|
1 |
$ sudo hostnamectl set-hostname k8-slave |
Slave 2 node:
|
1 |
$ sudo hostnamectl set-hostname k8-slave2 |
Additionally, update the /etc/hosts file for the 3 nodes as shown:
|
1 2 3 |
10.128.0.41 k8-master 10.128.0.39 k8-slave 10.128.0.40 k8-slave2 |
Let’s now jump right in and get started.
Step 1: Set up the hostname and update the host files
Right off the bat, log in to the Kubernetes Master Node and set up the master hostname as shown:
|
1 |
$ sudo hostnamectl set-hostname k8-master |
In the same vein, configure the hostname for the slave nodes by running the following commands:
|
1 2 |
$ sudo hostnamectl set-hostname k8-slave $ sudo hostnamectl set-hostname k8-slave2 |
Next, modify the /etc/hosts file for the 3 Kubernetes nodes as shown to reflect the hostname entries and IP addresses.
|
1 2 3 |
10.128.0.41 k8s-master 10.128.0.39 k8-slave 10.128.0.40 k8-slave2 |
Step 2: Install Docker on the Master and Slave Nodes
Before installing Docker, you need to update the package repositories. To achieve this, execute the command:
|
1 |
$ sudo apt update |
Next, install docker by invoking the command:
|
1 |
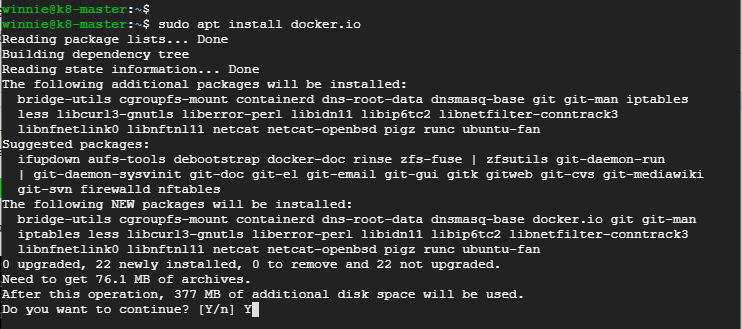
$ sudo apt-get install docker.io -y |
Once you have successfully installed docker, start and enable the Docker service on your Master and the slave nodes as shown.
|
1 2 |
$ sudo systemctl start docker $ sudo systemctl enable docker |

It’s prudent to verify that the docker service is running as expected by running the command on both the master and slave nodes.
|
1 |
$ sudo systemctl status docker |
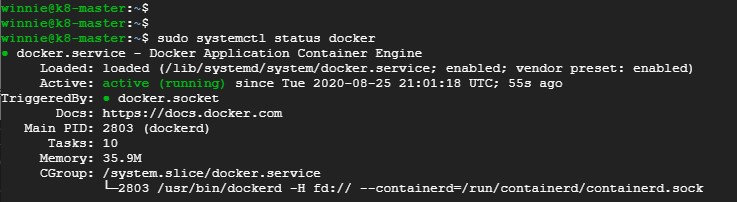
This should display the status of your Docker service as depicted in the screenshot above.
Confirm the Docker version you’ve installed and run by invoking the command:
|
1 |
$ docker –version |

Step 3: Configure the Kubernetes repository on the Master and Slave nodes
Before you get started in configuring the Kubernetes repository on your nodes, a few dependencies are essential. Run the command below to install the requisite dependencies:
|
1 |
$ sudo apt-get install software-properties-common apt-transport-https curl |
Thereafter, add Kubernetes GPG key as shown:
|
1 |
$ curl -s https://packages.cloud.google.com/apt/doc/apt-key.gpg | sudo apt-key add |
At the time of penning down this tutorial, there’s no Kubernetes package repository for Ubuntu 20.04 LTS and so we’ll use the repository for Ubuntu 16.04 – Xenial Xerus.
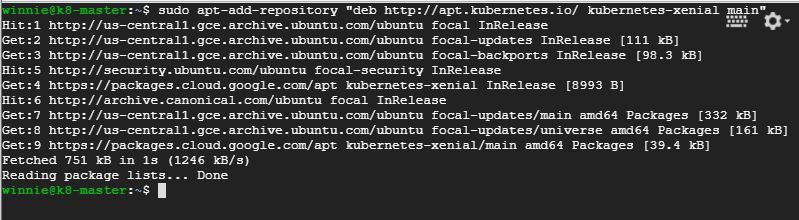
To append the repository run the command:
|
1 |
$ sudo apt-add-repository "deb https://apt.kubernetes.io/ Kubernetes-xenial main" |
Step 4: Disable OS swap and install kubeadm
To deploy multiple nodes on your Kubernetes cluster, you’ll first need to install the kubeadm package. However, the official Kubernetes site recommends that you first disable the OS swap feature on all the nodes.
Therefore, to disable swap on both the master and slave nodes, execute the following command:
|
1 |
$ sudo swapoff -a |
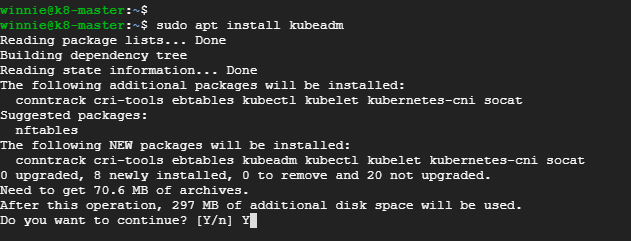
Proceed to install the kubeadm package following this command:
|
1 |
$ sudo apt-get install kubeadm -y |
Once you have successfully installed the kubeadm package, feel free to verify its version as shown:
|
1 |
$ kubeadm version |

Step 5: Create your Kubernetes Cluster using Kubeadm
To fire up your cluster, log in and start Kubernetes on your system’s Master node using kubeadm as illustrated in the below:
|
1 |
$ sudo kubeadm init --apiserver-advertise-address=10.128.0.41 --pod-network-cidr=172.16.0.0/16 |
Let’s dissect the command:
The --apiserver-advertise-address flag specifies the IP that the API server is listening on. If this is not specified, the default network interface will be assumed.
The --pod-network-cidr=172.16.0.0/16 flag specifies a IP address range foe the pod network, when set, CIDRs will automatically be allocated to every node. You should specify this is there’s conflict between the preferred pod network and some of the nodes in your LAN.
If the Kubernetes master node initializes successfully, you should see the output displayed below:
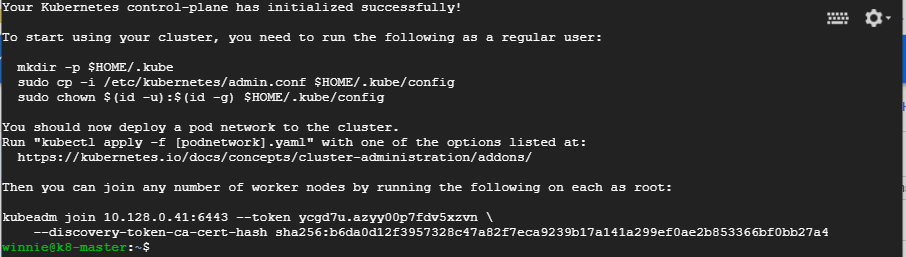
Take extra note of the last 2 lines at the bottom. This is the command that you will invoke at each of the ‘worker’ or slave nodes to join them to the Kubernetes cluster.
To initialize the Kubernetes cluster, execute the commands below one after the other as printed at the end of the output in the previous screenshot
|
1 2 3 |
$ mkdir -p $HOME/.kube $ sudo cp -i /etc/kubernetes/admin.conf $HOME/.kube/config $ sudo chown $(id -u):$(id -g) $HOME/.kube/config |
You can now verify your Master node’s status by executing the command:
|
1 |
$ kubectl get nodes |
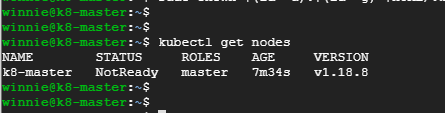
At this point, the system will notify you that the Master Node is not ready because no pod has been deployed so far… A pod network is the network infrastructure that enables your Kubernetes cluster nodes to communicate with each other. For this, you’ll need to supply an overlay network between all your Kubernetes cluster nodes. In this case, use Flannel as your pod network.
Step 6: Deploy Flannel as your pod network
On the master node, proceed and deploy the pod network. To do so, run the following command on the master node:
|
1 |
$ kubectl apply -f https://raw.githubusercontent.com/coreos/flannel/master/Documentation/kube-flannel.yml |
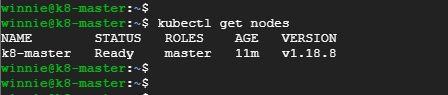
Once again, Verify the Master node’s status using the kubectl command. The status of the Master node should change from ‘NOT READY‘ to ‘READY’ as shown:
|
1 |
$ kubectl get nodes |
Proceed to verify the pod namespaces using the command:
|
1 |
$ kubectl get pods --all-namespaces |
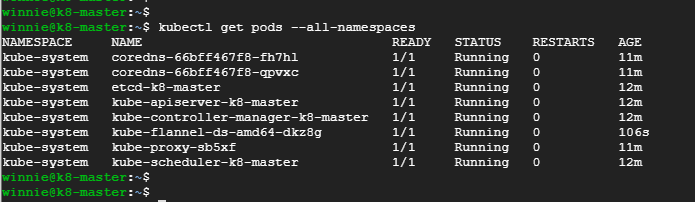
The output clearly confirms that all the pod namespaces are up and running.
Step 7: Add the Slave nodes to the Kubernetes cluster
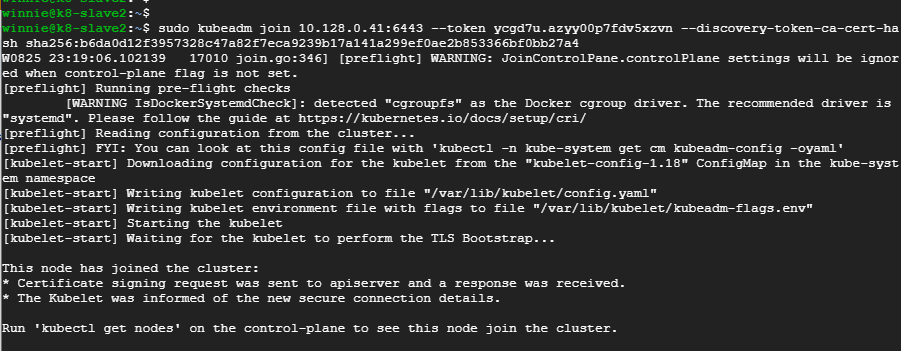
This final step involves connecting the slave nodes to the Kubernetes cluster. To achieve this, you’ll need to log in to each of the slave nodes. Paste the command that we discussed earlier in step 5 to join the Kubernetes cluster.
|
1 |
$ sudo kubeadm join 10.128.0.41:6443 --token ub3iwy.dpenf2sruqi1jjdz --discovery-token-ca-cert-hash sha256:b6da0d12f3957328c47a82f7eca9239b17a141a299ef0ae2b853366bf0bb27a4 |
If you didn’t save the command, you can run the following command at any given time to print out the joining command:
|
1 |
$ kubeadm token create --print-join-command |
Here’s a sample output for the command:
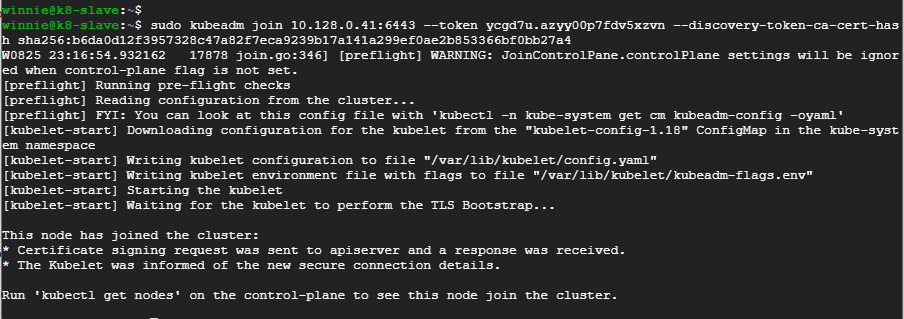
Head over to the other slave node and execute the same command:
Now, head over to the master node and establish the status of both the master and slave nodes via the command:
|
1 |
$ kubectl get nodes |
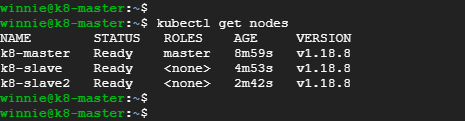
The output confirms the successful addition of your two slave nodes to the Kubernetes cluster on Ubuntu 20.04LTS. It also verifies the status of your master and slave nodes as ready. Perfect! This draws the curtains in the guide where we demonstrated adding 3 nodes on a Kubernetes cluster on Ubuntu 20.04LTS.
-

 DevOps6 years ago
Saltstack Tutorial for beginners [2025]
-

 DevOps6 years ago
How to build a Docker cron job Container easily [2025]
-

 Linux6 years ago
mail Command in Linux/Unix with 10+ Examples [2025]
-

 DevOps6 years ago
Docker ADD vs COPY vs VOLUME – [2025]
-
 DevOps5 years ago
How to setup Pritunl VPN on AWS to Access Servers
-

 Linux6 years ago
Grep Command In Unix/Linux with 25+ Examples [2025]
-
Linux5 years ago
How To setup Django with Postgres, Nginx, and Gunicorn on Ubuntu 20.04
-

 Linux6 years ago
Find command in Unix/Linux with 30+ Examples [2025]