
Linux
How to Use Rsync to Backup Or Sync Files Efficiently
Are you tired of losing important files or spending hours manually syncing data between devices? You’re not alone.
Many people struggle with keeping their files organized and secure. But there’s a powerful tool that can help you—Rsync. Whether you’re looking to back up your data or keep your files in sync across multiple devices, Rsync is your solution.
Imagine effortlessly syncing your documents, photos, and other important files with just a few commands. Rsync is not only efficient but also incredibly versatile. You can customize it to fit your specific needs, ensuring that you never lose track of your important data again. You’ll discover how to harness the power of Rsync to streamline your file management process. By the end of it, you’ll have the confidence to use Rsync like a pro, protecting your files and freeing up your time for what really matters. Keep reading to unlock the secrets of Rsync and transform the way you handle your data.

Credit: greenwebpage.com
What Is Rsync
What is Rsync?
Have you ever wished for a tool that effortlessly synchronizes your files across different devices or locations? Rsync might be your answer. This powerful utility is designed for Unix-based systems, making file transfer and synchronization a breeze. Not only does it handle backups with ease, but it also ensures your data remains consistent across platforms.
Understanding Rsync
Rsync stands for “remote synchronization.” It’s not just another file transfer tool; it’s a game changer in data management. Unlike traditional copy methods, Rsync compares the source and destination files to transfer only the changes. This means faster transfers and efficient use of bandwidth.
Picture this: you’ve made some changes in your project files and need to update them on a remote server. Instead of sending the entire folder again, Rsync identifies what’s new and only sends those updates. This saves you time and reduces network traffic.
Key Features Of Rsync
Why choose Rsync over other file syncing tools? Its features speak for themselves:
- Incremental Transfers: Rsync only transfers the parts of files that have changed, minimizing bandwidth usage.
- Compression: You can compress data during transfer to speed up the process.
- Preserve Metadata: Rsync can retain file permissions, timestamps, and symbolic links.
- Secure Transfers: Integrating with SSH ensures your data is safe during transit.
Imagine you’re on a tight deadline, working remotely with your team. Every second counts. Rsync’s incremental transfers ensure your updates reach collaborators instantly without the wait.
Getting started with Rsync is straightforward. Most Unix systems come with Rsync pre-installed, but if not, you can easily add it. A simple command in the terminal is often all you need:
|
1 |
sudo apt-get install rsync |
Now, you’re ready to sync files like a pro. Have you tried installing Rsync on your system yet? It’s easier than you might think.
Using Rsync: A Personal Experience
I remember the first time I used Rsync to sync a project across multiple devices. The process was seamless, and I was amazed at how quickly changes were mirrored. I had been struggling with slow file transfers, but Rsync transformed my workflow.
How do you manage your file syncing currently? Is there room for improvement? Rsync might be the tool that revolutionizes your approach.
In essence, Rsync is more than a tool; it’s a bridge between your devices, ensuring data consistency and efficiency. Ready to give it a try?

Credit: jumpcloud.com
Installing Rsync
Easily install Rsync to backup or sync files efficiently on Linux systems. Use simple commands to secure your data. Ensure your files stay updated and safe across multiple devices.
Installing Rsync is an essential first step for anyone planning to backup or sync files efficiently. Rsync is a powerful tool, allowing seamless file transfers across various systems. Whether you’re using Linux, macOS, or Windows, setting up Rsync is straightforward. Below, we outline how to install Rsync on each platform, ensuring you’re ready to streamline your file management tasks.
Installing On Linux
Linux users have the easiest path to installing Rsync. Most Linux distributions come with Rsync pre-installed. To verify, open your terminal. Type the command: rsync --version. If Rsync is not installed, use your package manager. For Debian-based systems like Ubuntu, type: sudo apt-get install rsync. For Red Hat-based systems, use: sudo yum install rsync. The installation process is quick. Once installed, test Rsync by checking its version again.
Installing On Macos
Installing Rsync on macOS requires a few steps. The system doesn’t include Rsync by default. Use a package manager like Homebrew to install it. First, install Homebrew by running: /bin/bash -c "$(curl -fsSL https://raw.githubusercontent.com/Homebrew/install/HEAD/install.sh)". Once Homebrew is ready, install Rsync with: brew install rsync. This command downloads and installs Rsync on your Mac. Confirm the installation by typing: rsync --version in the terminal.
Installing On Windows
Windows users can install Rsync using third-party tools. One popular option is Cygwin, which provides a Unix-like environment. Start by downloading Cygwin from its website. Run the setup file and select Rsync during the package selection step. Complete the installation process. Another option is using Windows Subsystem for Linux (WSL). Install WSL through the Microsoft Store, then follow the Linux installation steps. Once installed, check Rsync’s version in the command prompt.
Basic Rsync Commands
Rsync is a powerful tool for file backups and synchronization. It efficiently transfers and synchronizes files between two locations. Mastering the basic Rsync commands can significantly streamline your data management tasks.
Syntax And Options
The basic syntax of Rsync involves specifying the source and destination. The command typically starts with rsync, followed by options, then the source and destination paths. Example: rsync [options] source destination. The source and destination can be local or remote directories. Options modify how Rsync behaves.
Common options include -a for archive mode, -v for verbose output, and --delete to delete files not present in the source. Each option tweaks the command to suit different needs.
Commonly Used Flags
Flags enhance the functionality of Rsync commands. The -a flag is crucial for preserving file attributes. It ensures files retain their permissions and timestamps. The -v flag provides detailed information during the transfer process. Users see a list of files being transferred, which helps in tracking progress.
The --delete flag is used to keep the destination in sync with the source. It removes files from the destination that are no longer in the source. This is essential for maintaining an exact mirror of the source.
Other useful flags include -z for compressing data during transfer, which saves bandwidth. The -P flag shows progress and resumes incomplete transfers. Together, these flags optimize and secure file transfers.
Backing Up Files With Rsync
Rsync offers a simple way to back up or sync files efficiently. This tool transfers data between directories, ensuring data security and organization. With Rsync, automate file synchronization, saving time and effort in managing backups.
Backing up files with Rsync offers a reliable way to protect data. It’s efficient and ideal for both local and remote backups. Rsync ensures files are copied accurately and quickly. Let’s explore how you can use Rsync for creating local and remote backups.
Creating A Local Backup
Rsync makes local backups simple and effective. First, open your terminal. Then, use the Rsync command to specify source and destination directories. This command syntax is rsync -av /source/directory/ /destination/directory/. The -a flag ensures files are copied with permissions intact. The -v flag provides details about the backup process. Always check the paths to avoid errors. With Rsync, your local files stay safe and updated.
Remote Backup Techniques
Rsync also supports remote backups over SSH. This allows secure backups to another server. Begin by ensuring SSH access between your systems. Then, use a command like rsync -avz -e ssh /local/directory/ user@remote:/destination/directory/. The -z flag compresses files during transfer, saving bandwidth. This method is secure and efficient. You can automate this task with cron jobs for regular backups. This keeps your remote data current and protected.
Syncing Files With Rsync
Syncing files with Rsync is a powerful way to ensure your important data is consistently up-to-date across different systems. Whether you’re working on a personal project or managing files across a business network, Rsync provides a reliable solution. Have you ever wondered how to keep your files synchronized without spending hours manually transferring them? Rsync offers a structured approach to make this task seamless and efficient.
One-way Sync
One-way sync is perfect when you want to mirror files from a source to a destination without worrying about changes in the destination affecting your source. Imagine backing up your photos to an external hard drive. Using Rsync, you can automatically transfer new files from your computer to the hard drive without duplication. This method keeps your backup organized and clutter-free.
You can easily initiate a one-way sync with a simple command. Specify the source directory and the destination, and Rsync does the rest. It’s like having a digital assistant keeping your files tidy and updated. Have you tried setting up a one-way sync for your personal documents yet?
Two-way Sync
Two-way sync is ideal for collaboration and teamwork. It ensures that any changes made in either the source or destination are reflected in both locations. Imagine working on a shared project with a colleague. As you update files on your end, Rsync simultaneously updates your colleague’s version, ensuring you are both on the same page.
Setting up a two-way sync involves a bit more configuration but offers immense benefits. It eliminates the confusion of file version mismatches and enhances productivity by keeping everyone aligned. Could this be the missing piece in your team’s workflow?
Using Rsync to sync files is more than just a technical process; it’s a strategy to save time and reduce errors. Implementing Rsync can transform how you manage data, making your life simpler and your work more efficient. Are you ready to take control of your file syncing needs?
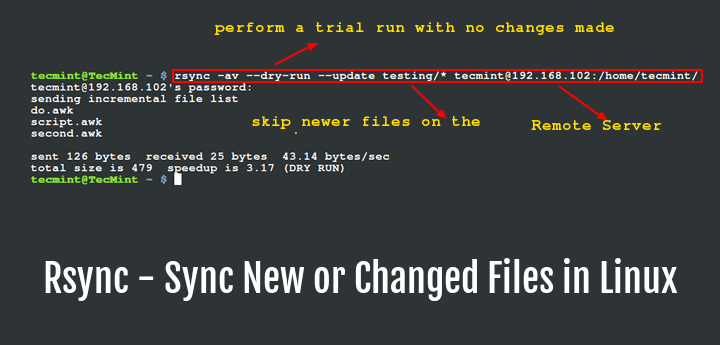
Credit: www.tecmint.com
Advanced Rsync Features
Rsync offers advanced features for efficient file backup and synchronization. Utilize its incremental backups to save time and space. Customize file transfers with options like compression and deletion.
When you think of backing up or syncing files, Rsync might not be the first tool that pops into your mind. Yet, it’s packed with advanced features that make it a powerful ally in data management. Whether you’re a tech enthusiast or just someone trying to keep your files safe, understanding these advanced features can elevate your file syncing process.
###
Using Ssh For Secure Transfer
Have you ever worried about the security of your data during transfer? With Rsync, you can use SSH to ensure your files travel securely over the network. This means your data remains private and protected from prying eyes.
To use SSH with Rsync, simply add the -e ssh option to your command. This straightforward step enhances security without complicating the process. Imagine the peace of mind knowing your files are secure, even when syncing over public networks.
###
Incremental Backups
Incremental backups are a game-changer, saving you time and storage space. Rsync excels at this by only copying the changes made since the last backup. This means faster backups and less strain on your storage.
Picture this: you’ve just made a few edits to a large project. Instead of backing up the entire project again, Rsync updates only the modified files. This efficiency can save you hours, especially if you frequently update your files.
###
Excluding Files And Directories
Not every file is worth backing up. Rsync allows you to exclude specific files and directories, giving you control over what gets synced. This is particularly useful for excluding temporary files or large directories you don’t need to backup.
To exclude files, you can use the --exclude option followed by the pattern of files or directories you want to skip. Think about the clutter you can avoid by excluding unnecessary files. Wouldn’t you rather have a clean, organized backup? This feature ensures your storage is dedicated to what truly matters.
By leveraging these advanced Rsync features, you can tailor your syncing and backup processes to fit your unique needs. Have you tried any of these features yet? They might just transform the way you manage your files.
Automating Rsync Tasks
Rsync automates file backup and synchronization, simplifying data management. It efficiently copies files between directories or systems. This tool supports incremental backups, saving time and storage.
Automating Rsync Tasks can transform your file management experience, saving you time and reducing the risk of human error. Imagine never having to remember when to back up your files or sync data between devices. By setting up automated Rsync tasks, you can ensure your files are always up-to-date without lifting a finger.
Using Cron Jobs
Cron jobs offer a simple way to automate Rsync tasks on Linux or Unix-based systems. They allow you to schedule tasks at specific intervals, ensuring your files are backed up or synced regularly.
To get started, open your terminal and type crontab -e to edit your cron jobs list. You’ll need to understand the basic syntax, which involves specifying the minute, hour, day, month, and day of the week for your task. For example, to run Rsync every day at midnight, you’d add a line like this:
0 0 rsync -av /source/directory /destination/directory
The simplicity of cron jobs is their main charm. Once set, they quietly work in the background, giving you peace of mind.
Scheduling With Windows Task Scheduler
For Windows users, the Task Scheduler is your go-to tool for automating Rsync. It’s a bit different from cron jobs but equally effective. You can set it up to run Rsync at specific times or in response to particular events.
To create a new task, open the Task Scheduler from the Start menu. Choose “Create Basic Task” and follow the wizard to set up your task. You’ll need to define the action as running a program, and here, you’ll specify the Rsync command.
Make sure your Rsync executable is accessible from the command line, or provide the full path. This setup ensures that even if you forget, your files are backed up or synced as needed.
Have you ever missed a crucial backup because you simply forgot? With these automation tools, that worry becomes a thing of the past. Embrace the power of automation and let your systems do the heavy lifting.
Troubleshooting Rsync
So, you’ve started using Rsync to backup or sync files, and suddenly, you’re stuck. Troubleshooting Rsync can feel like you’re navigating a maze. But don’t worry, you’re not alone. Many users face challenges with Rsync, but with a little guidance, you can solve most issues and ensure your sync process runs smoothly. Let’s dive into some common errors and their fixes, along with tips on optimizing performance. You’ll soon be a Rsync pro.
Common Errors And Fixes
Running into errors with Rsync is frustrating, but usually, the fixes are straightforward. One frequent problem is permission denied errors. You might see this when trying to sync files. To resolve it, ensure you have the necessary permissions for both source and destination directories. Use the sudo command if needed, or check file ownership settings.
Another common hiccup is network connection issues. If Rsync fails due to a network error, double-check your network settings. Confirm that both devices are on the same network and that firewalls aren’t blocking Rsync traffic.
Ever seen an error about missing destination directory? It happens. Make sure the directory exists before starting your Rsync command. Create it manually if necessary. This simple step can save you a lot of trouble.
Performance Optimization Tips
Rsync is powerful but can sometimes be slow. You might wonder how to speed it up. Consider using the --compress flag. It compresses data during transfer, speeding up the process significantly.
Also, use the --partial flag. It helps resume interrupted transfers without starting over, saving time and bandwidth. If you often sync large files, this flag is your friend.
Curious about how to minimize CPU usage? Try the --bwlimit option. It limits bandwidth use, reducing the strain on your system. This is especially useful if you’re working on older hardware or have multiple tasks running simultaneously.
Have you ever thought about using Rsync in combination with cron jobs? Automate your sync tasks to run during off-peak hours. This ensures your system isn’t bogged down while you’re using it for other work.
Remember, troubleshooting Rsync is not just about fixing errors; it’s about improving efficiency. What challenges have you faced with Rsync, and how did you overcome them? Share your experiences and strategies with others. You might inspire someone facing the same issues!
Frequently Asked Questions
Is Rsync Good For Backup?
Yes, rsync is effective for backup. It efficiently syncs files and directories between locations. Its incremental backup feature saves time and bandwidth. The tool also supports encryption for secure data transfer, making it reliable. Rsync’s versatility and efficiency make it a popular choice for backups.
What Are Some Disadvantages Of Using Rsync?
Rsync lacks encryption, posing security risks during data transfer. It consumes high CPU usage for large files. Compatibility issues arise with different rsync versions. Rsync doesn’t support partial file updates efficiently. Configuration complexity can lead to errors.
What Is The Difference Between Rsync And Cp Backup?
Rsync synchronizes files efficiently by transferring only changed data. CP copies entire files, resulting in more data transfer. Rsync is faster for incremental backups, while CP is straightforward but less efficient for large data sets. Rsync offers more advanced features and flexibility compared to CP.
How Do I Send Files Using Rsync?
Use rsync to send files by typing rsync -avz source/ user@destination:/path/. Replace source with your file or directory, user with the remote username, and destination with the remote server address. This command synchronizes files efficiently.
Conclusion
Rsync offers a simple solution for backing up or syncing files. Its powerful features ensure data safety and easy file management. Start using Rsync today to secure your important files. Practice using different options to find what works best for you.
With time, you’ll get more comfortable with Rsync’s commands. Stay consistent with your backups for peace of mind. Remember, keeping data safe is crucial. Rsync makes it straightforward and reliable. Explore its capabilities and streamline your file management tasks. Embrace the ease and efficiency Rsync brings to your digital life.
-

 DevOps6 years ago
Saltstack Tutorial for beginners [2025]
-

 DevOps6 years ago
How to build a Docker cron job Container easily [2025]
-

 Linux7 years ago
mail Command in Linux/Unix with 10+ Examples [2025]
-

 DevOps7 years ago
Docker ADD vs COPY vs VOLUME – [2025]
-
 DevOps6 years ago
How to setup Pritunl VPN on AWS to Access Servers
-

 Linux7 years ago
Grep Command In Unix/Linux with 25+ Examples [2025]
-

 Linux7 years ago
Find command in Unix/Linux with 30+ Examples [2025]
-
Linux6 years ago
How To setup Django with Postgres, Nginx, and Gunicorn on Ubuntu 20.04