
DevOps
Turning a Raspberry Pi into a Linux Home Server: DIY Guide
Imagine having your own personal home server, a versatile hub that can manage your files, run a website, or even control smart devices—all from the comfort of your home. Sounds expensive and complicated, right?
Not when you have a Raspberry Pi. This tiny, budget-friendly device can transform your digital life and streamline your tech needs. By turning a Raspberry Pi into a Linux home server, you gain the power to customize and control your digital environment like never before.
You might be wondering: why should you dive into this project? Well, if you’ve ever felt limited by commercial servers or worried about privacy, this is your solution. Plus, it’s a fun and rewarding experience that enhances your tech skills. Whether you’re a tech enthusiast or just someone curious about maximizing your gadgets, this guide is tailored for you. Ready to uncover the potential of your Raspberry Pi? Let’s get started.

Credit: www.reddit.com
Choosing The Right Raspberry Pi Model
Turning a Raspberry Pi into a Linux Home Server is exciting and useful. The first step is choosing the right Raspberry Pi model. Not all models suit every project. Each Raspberry Pi has its strengths. Understanding these can help make the best choice for your server needs.
Choosing Based On Performance
Performance is key. Raspberry Pi 4 offers the best speed. It handles tasks quickly. It has a powerful processor and more RAM options. This makes it ideal for heavier server loads. If performance is a priority, Raspberry Pi 4 is a good pick.
Considering Memory Needs
Memory affects how much your server can handle. Raspberry Pi models vary in RAM. Raspberry Pi 4 can have up to 8GB RAM. This suits demanding applications. For simple tasks, Raspberry Pi 3 with 1GB RAM may be enough. Decide based on your server’s needs.
Evaluating Connectivity Options
Connectivity is vital for a server. Raspberry Pi 4 has improved connectivity. It offers Gigabit Ethernet for faster network speeds. It also has dual-band Wi-Fi. This ensures reliable internet access. Choose a model that meets your connectivity requirements.
Assessing Power Consumption
Power consumption is a concern for home servers. Raspberry Pi models are energy-efficient. Raspberry Pi Zero uses the least power. It’s suitable for lightweight tasks. Raspberry Pi 4 uses more power but delivers more performance. Consider your electricity cost and server demands.
Understanding Your Budget
Budget influences your choice. Raspberry Pi models vary in cost. Raspberry Pi Zero is the cheapest. It’s great for basic tasks. Raspberry Pi 4 costs more. It offers better performance and features. Balance your budget with your server needs.
Necessary Hardware And Accessories
Transforming a Raspberry Pi into a Linux home server requires essential hardware and accessories. Obtain a reliable power supply, microSD card, and Ethernet cable. These components ensure smooth operation and connectivity, turning your Raspberry Pi into a functional server.
Transforming a Raspberry Pi into a Linux home server is an exciting project that can enhance your tech skills and add functionality to your home network. But before you dive in, you need the right hardware and accessories. Let’s explore what you’ll need to get started.Power Supply Requirements
Your Raspberry Pi needs a reliable power source to run smoothly. A power supply with at least 5V/3A is recommended for most Raspberry Pi models. Make sure it has a USB-C connector if you’re using the Raspberry Pi 4. A poor power supply can cause your device to underperform or even crash, so choose wisely.Storage Options
Storage is crucial for a home server. You have several options, from microSD cards to external hard drives. A microSD card with at least 32GB is a good starting point. For more storage, consider a USB external drive. Keep in mind that faster storage can improve performance, especially if you’re hosting media files or running applications.Network Connectivity
Reliable network connectivity ensures your server is accessible at all times. The Raspberry Pi comes with built-in Wi-Fi, but using a wired Ethernet connection can provide more stable and faster speeds. If your router is far from the Pi, consider using a network switch or powerline adapter to bridge the gap. Are you planning to access your server remotely? If so, dynamic DNS services can help you keep track of your IP address. Your Raspberry Pi home server is more than just a project; it’s a window to endless possibilities. By choosing the right hardware and accessories, you set the stage for success. What unique features will you add to your server?Installing The Linux Operating System
Transforming a Raspberry Pi into a Linux home server enhances its functionality. Installing the Linux operating system on it is straightforward. This setup offers a cost-effective solution for managing files and media at home.
Installing the Linux operating system on a Raspberry Pi transforms it into a versatile home server. This process involves selecting the right Linux distribution, preparing the SD card, and configuring the system. Each step is crucial for a smooth setup. Whether it’s for hosting a website or managing files, the Raspberry Pi can handle it. Let’s dive into the steps.Selecting A Linux Distribution
Choosing the right Linux distribution is important. Raspbian is the most popular choice. It is specifically designed for Raspberry Pi. It offers stability and a large support community. Ubuntu is another option. It’s user-friendly and feature-rich. You can also explore other distributions like Manjaro or Arch Linux. Each offers unique features. Consider your needs and comfort level.Preparing The Sd Card
Start with a good quality SD card. At least 16GB is recommended. First, format the SD card using a tool like SD Card Formatter. Download the chosen Linux distribution’s image file. Use software like Balena Etcher to write the image to the SD card. Insert the SD card into your computer. Open Balena Etcher. Select the image file. Choose the SD card as the target. Click “Flash” to start the process. This may take a few minutes. Once done, your SD card is ready.First Boot And Basic Configuration
Insert the SD card into the Raspberry Pi. Connect a monitor and keyboard. Power up the device. The Raspberry Pi will boot from the SD card. Follow the on-screen instructions. Configure basic settings like language and time zone. Set up a secure password. Update the system to the latest version. This ensures optimal performance and security. Your Raspberry Pi is now ready for server tasks. Explore its capabilities and start setting up your home server services.Setting Up Network Access
Transform a Raspberry Pi into a Linux home server effortlessly. Configure network access to manage your devices remotely. Secure connections ensure smooth and efficient operation.
Setting up network access is a crucial step in transforming your Raspberry Pi into a powerful Linux home server. Without proper network configuration, your server might remain isolated, unable to communicate effectively with other devices. This step ensures that your Raspberry Pi is seamlessly connected to your home network, allowing you to manage and access it from anywhere. Whether you’re using Wi-Fi or Ethernet, assigning a static IP address, or enabling SSH for remote management, each choice impacts how efficiently your server operates. Let’s dive into these essential settings.Configuring Wi-fi Or Ethernet
Deciding between Wi-Fi and Ethernet boils down to your connectivity needs. Ethernet offers stable and faster connections, ideal for high-demand tasks. If your Pi is close to your router, go for Ethernet. Wi-Fi provides flexibility in positioning your Raspberry Pi. It’s perfect for setups where the Pi needs to be moved or is far from the router. Ensure your Wi-Fi signal is strong enough to avoid connectivity issues.Assigning A Static Ip Address
Imagine trying to find your Raspberry Pi on a network where its address keeps changing. Assigning a static IP address fixes this. It’s like giving your Pi a permanent home address on your network. A static IP ensures your server is always reachable. You won’t have to hunt for its address when you need to access it. This is particularly useful for remote management and automation tasks.Enabling Ssh For Remote Management
SSH opens the door to managing your server without physically accessing it. Have you ever wished you could tweak your server settings from the comfort of your couch? SSH makes this possible. Enable SSH to communicate with your server remotely. It’s secure and lets you execute commands, install software, and troubleshoot from anywhere. Just imagine managing your server while sipping coffee in a café. Have you considered the security implications of enabling SSH? It’s crucial to set a strong password and possibly use key-based authentication. This ensures your server remains safe from unauthorized access. By addressing these network settings, you ensure your Raspberry Pi server is both accessible and secure, ready to serve your needs efficiently. How will setting up network access shape your Raspberry Pi journey?Installing And Configuring Server Software
Transform a Raspberry Pi into a Linux home server effortlessly. Begin by selecting the suitable server software compatible with your Pi. Follow the steps to install and configure it, enabling seamless file sharing and media streaming.
Turning your Raspberry Pi into a Linux home server is a rewarding project. Once you have set up the Raspberry Pi, the next step is installing and configuring server software. This process transforms the Pi into a powerful tool for managing various server tasks. Let’s dive into some essential setups for your home server. ###Web Server Setup
Setting up a web server on your Raspberry Pi opens up many possibilities. Begin by installing Apache or Nginx. Both are popular and reliable web server software. Use the terminal to install your chosen software. Once installed, configure the settings to match your network environment. This setup allows you to host websites directly from your Raspberry Pi. ###File Sharing With Samba
Samba enables file sharing between different operating systems. To install Samba, use the terminal to download the necessary packages. After installation, configure Samba by editing its configuration file. Define shared folders and set permissions. This setup allows you to share files seamlessly across your home network. ###Media Server With Plex Or Kodi
For media streaming, Plex and Kodi are excellent choices. Plex is user-friendly, offering a smooth setup process. Install Plex via the terminal and configure it through its web interface. Kodi offers a customizable media experience. Install Kodi using the terminal and explore its add-ons for enhanced functionality. Both options turn your Raspberry Pi into a versatile media server. These setups enhance your Raspberry Pi’s capabilities significantly. Enjoy your powerful, compact home server.
Credit: www.youtube.com
Enhancing Security Measures
Transforming a Raspberry Pi into a Linux home server boosts your security measures effectively. This compact device offers a cost-efficient solution for managing and safeguarding personal data. Enhance your network’s protection by leveraging its versatile capabilities to monitor and control access.
Turning a Raspberry Pi into a Linux home server offers many benefits. One of the most crucial aspects is enhancing security measures. Protecting your server ensures your data remains safe. Implementing security is not only essential but also empowering. With a few steps, you can safeguard your system effectively.Setting Up A Firewall
A firewall is vital for protecting your server. It blocks unwanted access and monitors traffic. Setting up a firewall on your Raspberry Pi is simple. Use tools like UFW (Uncomplicated Firewall). Start by installing it with a quick command. Then, configure rules to allow or block traffic. Regularly review these rules. This keeps your server safe from intruders.Creating Secure User Accounts
Secure user accounts are a must for any server. Create accounts with strong, unique passwords. Avoid using default settings. Regularly update passwords to enhance security. Limit access to sensitive files. Only trusted users should have access. This helps prevent unauthorized changes or data theft. Use SSH keys for remote access. This adds an extra layer of security.Regular System Updates
Keeping your system updated is crucial. Updates fix vulnerabilities and improve security. Regularly check for updates on your Raspberry Pi. Use commands to update your system easily. Schedule automatic updates if possible. This ensures you don’t miss important patches. Updates help maintain security and performance. Always backup data before updating. This protects against potential issues.Monitoring And Maintenance
Transforming a Raspberry Pi into a Linux home server requires regular monitoring and maintenance. Ensure optimal performance by checking system updates and backups frequently. Regular monitoring prevents issues and keeps your server running smoothly.
Turning your Raspberry Pi into a Linux home server is rewarding. It provides flexibility and control over your digital ecosystem. Regular monitoring and maintenance ensure your server runs smoothly. Keep your server healthy and secure with these practices.Using System Monitoring Tools
Use system monitoring tools to keep an eye on your server’s health. Tools like htop provide real-time updates on CPU usage. They show memory consumption and running processes. This helps identify problems early. Simple interface means anyone can use them. Stay informed and prevent issues before they occur.Automating Backups
Automate backups to protect your data. Use tools like rsync for regular backups. They save time and reduce human error. Schedule backups to run during low-traffic hours. Ensure your data is safe in case of failure. This adds peace of mind and security.Troubleshooting Common Issues
Troubleshoot common issues with a systematic approach. Check logs for error messages. Use forums to find solutions from other users. Restart services if things seem off. Keep your system updated to avoid bugs. Regular checks help maintain server reliability.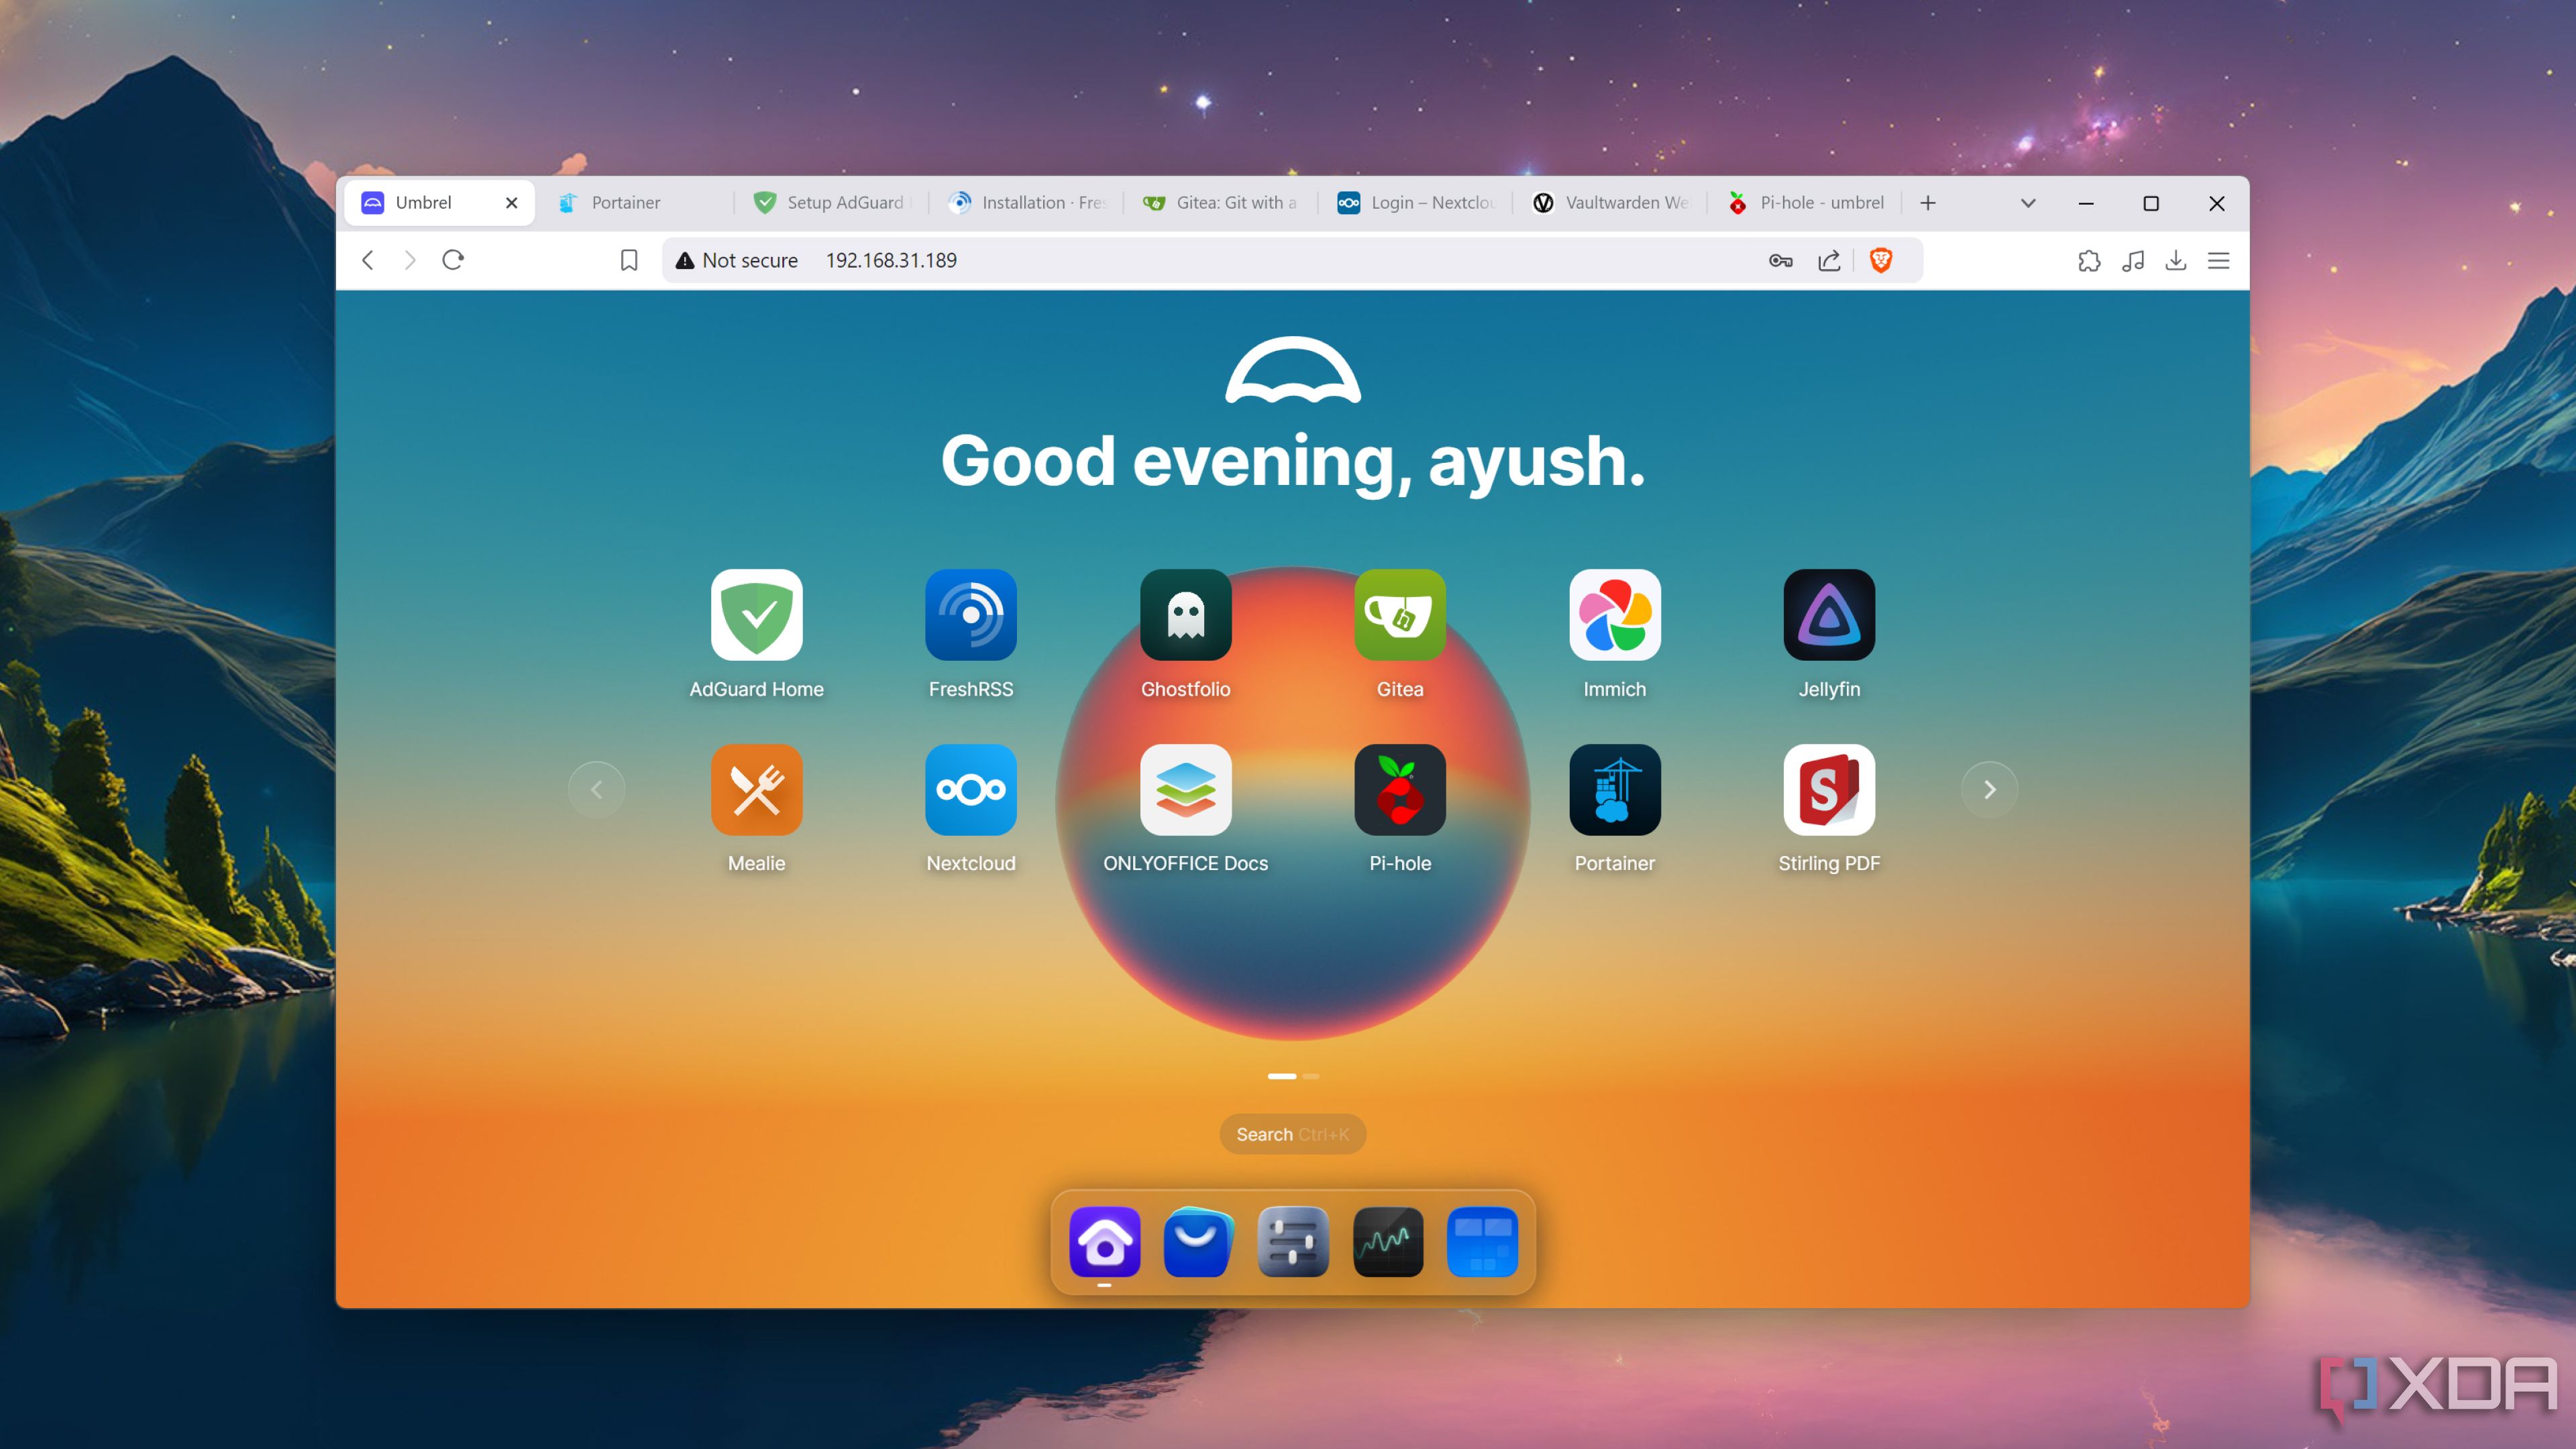
Credit: www.xda-developers.com
Frequently Asked Questions
What Can A Raspberry Pi Home Server Do?
A Raspberry Pi home server can host websites, manage files, and run media servers. It can also handle home automation tasks and serve as a VPN. With its low cost and energy efficiency, it’s a versatile tool for tech enthusiasts looking to streamline their digital ecosystem.
How Do I Set Up A Raspberry Pi Server?
To set up a Raspberry Pi server, install a Linux distribution like Raspbian. Connect it to your network, and configure it for your desired services. Use software like Apache for web hosting or Samba for file sharing. Follow guides to ensure a smooth setup process.
Is A Raspberry Pi Powerful Enough For A Server?
Yes, a Raspberry Pi is powerful enough for basic server tasks. It can handle small-scale web hosting, file management, and media streaming. However, for more demanding applications, consider higher models like the Raspberry Pi 4, which offers improved performance and memory.
What Are The Benefits Of A Raspberry Pi Server?
A Raspberry Pi server is cost-effective, energy-efficient, and highly customizable. It offers flexibility for various applications, from web hosting to media streaming. Its compact size allows easy integration into home setups, making it an ideal choice for tech enthusiasts and beginners alike.
Conclusion
Transforming a Raspberry Pi into a Linux home server offers flexibility. It’s cost-effective and suits various needs. Setting it up is simple with the right guide. You can manage files, host websites, or stream media. Raspberry Pi provides a compact and powerful solution.
This project enhances technical skills and creativity. It’s perfect for small home networks. Start exploring the possibilities today. Your home server awaits. Enjoy the benefits and simplicity. Embrace the world of Linux and Raspberry Pi. It’s a rewarding journey. Happy server building!
-

 DevOps6 years ago
Saltstack Tutorial for beginners [2025]
-

 DevOps6 years ago
How to build a Docker cron job Container easily [2025]
-

 Linux7 years ago
mail Command in Linux/Unix with 10+ Examples [2025]
-

 DevOps7 years ago
Docker ADD vs COPY vs VOLUME – [2025]
-
 DevOps6 years ago
How to setup Pritunl VPN on AWS to Access Servers
-

 Linux7 years ago
Grep Command In Unix/Linux with 25+ Examples [2025]
-

 Linux7 years ago
Find command in Unix/Linux with 30+ Examples [2025]
-
Linux6 years ago
How To setup Django with Postgres, Nginx, and Gunicorn on Ubuntu 20.04